Have you ever wanted to capture the delicate beauty of a rose on paper but didn’t know where to start? Drawing a rose might seem tricky at first, but with the right steps, you can create a stunning, lifelike flower that will impress everyone.
In this guide, you’ll discover simple, clear instructions that anyone can follow—whether you’re a complete beginner or just looking to sharpen your skills. By the end, you’ll not only have a beautiful rose drawing, but you’ll also unlock the confidence to bring your artistic ideas to life.
Ready to see how easy and rewarding drawing a rose can be? Let’s get started!

Credit: www.jeyram.org
Basic Shapes
Starting a rose drawing is easier with simple shapes. Basic shapes act as the foundation. They help guide the overall form and proportions.
Breaking down the rose into circles and ovals makes the process clear. These shapes keep the drawing balanced and natural. Use light pencil strokes to sketch them. This way, corrections are simple.
Drawing The Base Circle
Begin by drawing a circle for the rose’s base. This circle represents the flower’s main body. It sets the size and position on your paper. The circle does not need to be perfect. A slightly uneven shape adds natural look.
Keep the circle light and loose. It will be the guide for the petals. Make sure it is big enough to fit your rose design.
Sketching The Oval Swirl
Inside the base circle, draw an oval swirl. This swirl forms the rose’s center. It shows the way the petals curl inward. Start the swirl from the middle and work outward.
Use smooth, curved lines for the swirl. Keep it soft and flowing. The oval shape helps create depth and movement. It gives your rose a realistic feel.
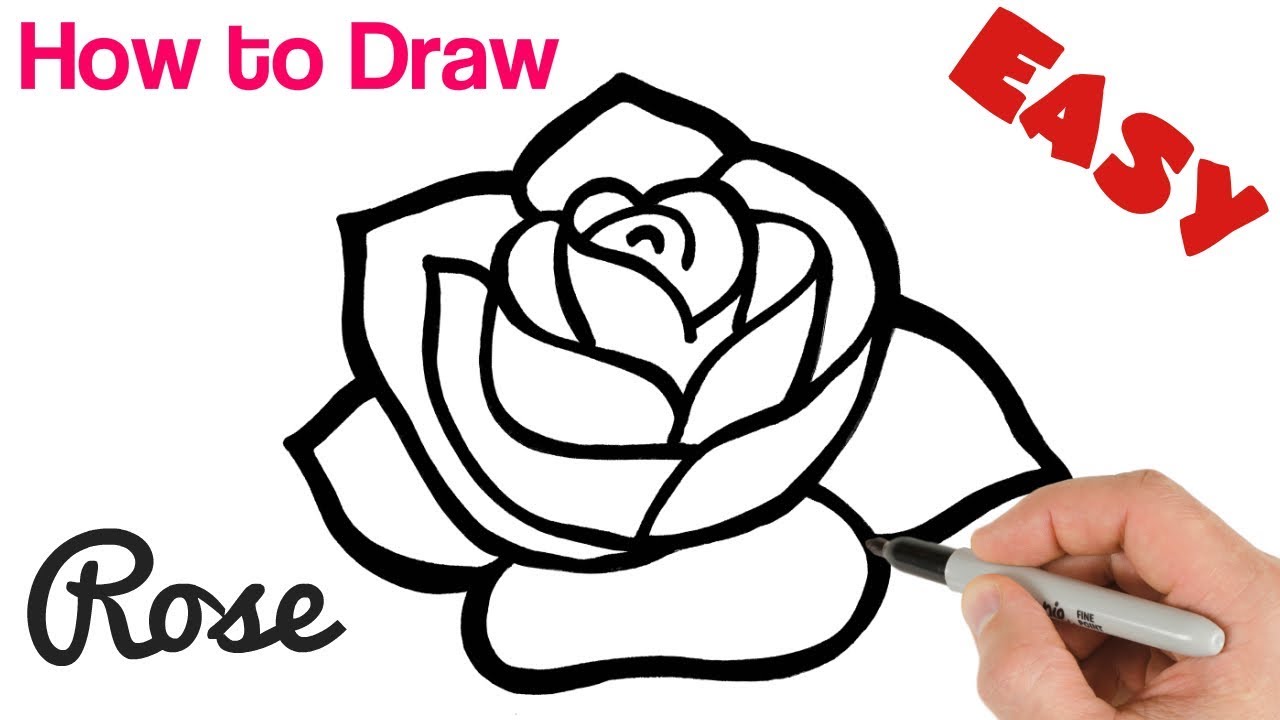
Credit: www.youtube.com
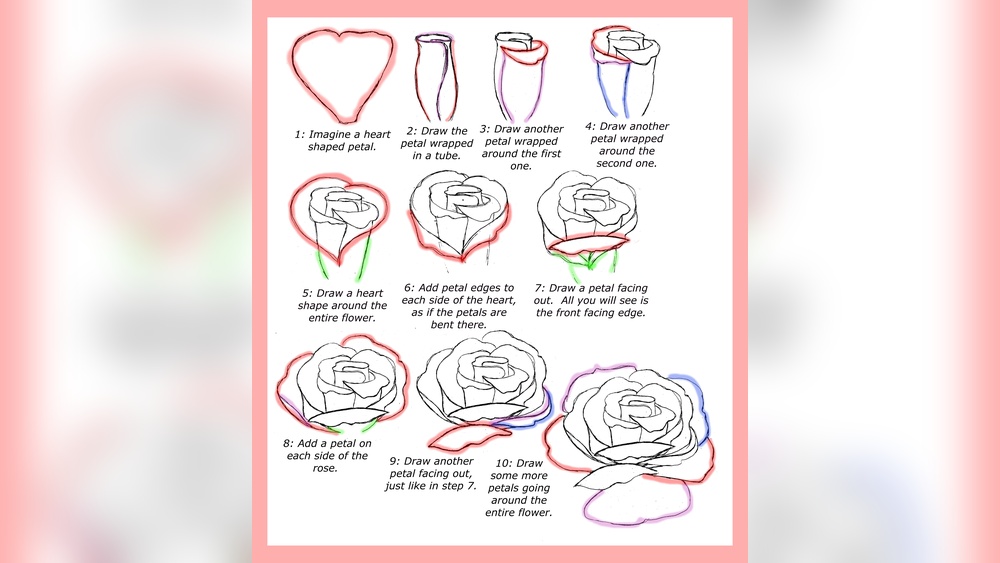
Petal Formation
Petal formation shapes the beauty of your rose drawing. It defines the flower’s structure and depth. Start with simple petal shapes and build complexity step by step. Each petal adds volume and life to the rose. Follow the natural flow of petals to make your drawing look realistic. Focus on layering petals to create a full bloom effect. This section breaks down petal formation into clear steps for easy understanding.
Creating The Center Petals
Begin by drawing the center petals. These petals are small and tightly packed. Use curved lines to form a spiral shape. The spiral creates the illusion of petals unfolding. Keep the lines close together for a dense center. This part sets the foundation for the entire rose. Draw gently to allow easy adjustments later.
Adding Outer Petals
Next, add the outer petals around the center. These petals are larger and open wider. Draw soft, rounded shapes that overlap slightly. Vary the size and angle for a natural look. Outer petals should curve outward gently. Avoid perfect symmetry; real petals are irregular. This step brings openness to your rose sketch.
Building Layered Petals
Build layers by repeating petal shapes around the flower. Each layer should appear behind the previous one. Overlap petals to add depth and dimension. Use light shading to separate layers visually. Layered petals make the rose look full and rich. Continue layering until the rose reaches your desired size. This technique gives your drawing a three-dimensional feel.
Stem And Leaves
The stem and leaves give life to your rose drawing. They support the flower and add natural beauty. Focus on simple shapes first, then build details slowly. This will help you create a realistic and balanced look. Use soft strokes for a gentle, natural feel. Follow these steps to draw the stem and leaves clearly.
Drawing The Stem
Start with a long, slightly curved line for the stem. Keep it narrow and taper it a bit toward the top. Draw a parallel line next to it to show thickness. Connect both ends with soft curves. Avoid making the stem perfectly straight. A slight bend adds realism and flow.
Shaping The Leaves
Leaves grow on the stem in pairs or alone. Draw simple oval shapes with pointed ends. Place them at different angles along the stem. Use light strokes to sketch the outline first. Make sure the leaves are bigger near the bottom and smaller near the top. This shows natural growth and balance.
Adding Leaf Details
Draw a central vein running from the base to the tip of each leaf. Add smaller veins branching out from the main vein. Use short, thin lines for veins to keep them delicate. Shade lightly along the veins for depth. This detail brings your leaves to life without overcomplicating the drawing.
Thorns And Texture
Thorns and texture give a rose drawing its lifelike quality. Thorns add character and detail to the stem. Texture brings depth and realism to petals and leaves. These features make your rose more interesting and natural. Focus on simple shapes for thorns and gentle shading for texture.
Sketching Thorns
Start by drawing small, pointed shapes along the stem. Space the thorns unevenly to look natural. Use short, curved lines for the base of each thorn. Keep the thorns sharp but not too large. Lightly sketch first, then darken the lines once happy with placement.
Vary thorn size slightly to add variety. Avoid perfect symmetry to keep the drawing organic. Place some thorns closer together and others farther apart. Let a few thorns overlap the stem edges for a 3D effect.
Adding Texture To Petals And Stem
Texture creates a soft and natural feel in your rose. Use gentle shading on petals to show folds and curves. Draw thin lines from the base of each petal outward. Vary line length and thickness to mimic real petals.
Shade the stem with light strokes to suggest roundness. Add small dots or short lines to hint at roughness. Blend shading smoothly to avoid harsh edges. These details help your rose appear delicate and true to life.
Shading Techniques
Shading is key to making your rose drawing look alive and full of depth. Proper shading brings out the natural curves and layers of rose petals. It helps create a sense of light and space in your artwork. By using the right shading techniques, your rose will appear more realistic and three-dimensional.
Light And Shadow Placement
Start by deciding where your light source is. This spot will be the brightest on the petals. Shade the areas farthest from the light to create shadows. Shadows add volume and make petals look curved. Use lighter strokes near the light and darker ones in the shadows. Avoid shading all petals the same way. Each petal should have its own light and dark spots.
Blending For Realism
Blending softens harsh lines between light and shadow. Use a blending stump or a soft tissue to smooth shading. Blend gently in circular motions to keep texture. Avoid over-blending, or the petals may look flat. Adding subtle gradients between light and dark enhances depth. Blending helps petals flow into each other naturally. This technique makes your rose drawing look lifelike and smooth.
Coloring Tips
Adding color to your rose drawing brings it to life. Use simple techniques to make the colors look natural and vivid. These coloring tips help you create beautiful, realistic roses. Focus on choosing the right colors, layering them well, and adding highlights for depth.
Choosing Color Palettes
Select colors that match the type of rose you want to draw. Reds, pinks, yellows, and whites are common rose colors. Use softer shades for petals and darker tones for shadows. Green tones work best for leaves and stems. Keep your palette limited to a few colors to avoid confusion.
Layering Colors
Start coloring with light shades first. Gradually add darker colors on top to build layers. Blend the colors gently to create smooth transitions. Use small strokes to follow the shape of the petals. Layering helps your rose look more three-dimensional and natural.
Highlighting And Depth
Add highlights with a light color or white to show where light hits the petals. Darken the areas where petals overlap or curve inward. This contrast creates depth and realism. Use a soft touch for highlights to keep them subtle. Shadows and highlights make your rose drawing more dynamic.
Advanced Variations
Advanced variations in rose drawing help you explore creativity beyond basic shapes. These techniques allow you to capture different rose forms and arrangements. Experimenting with buds, wreaths, and miniature roses adds depth to your skills. Each style has unique steps and details that enhance your artwork.
Drawing Rose Buds
Rose buds show the flower before it blooms. Start with a small oval or teardrop shape for the bud. Add gentle curves around it to form closed petals. Use soft lines to keep the bud delicate and tight. Shade lightly to give volume and form.
Creating Rose Wreaths
Rose wreaths are circular arrangements of roses and leaves. Begin by sketching a light circle as a guide. Place roses evenly along the circle’s edge. Draw leaves and small buds between the flowers. Keep the shapes simple but connected to form a natural ring.
Sketching Miniature Roses
Miniature roses are smaller and simpler than full blooms. Use tiny circles for the center of each flower. Add fewer petals around the center to keep the design compact. Focus on clear, clean lines for easy recognition. These are perfect for patterns and small spaces.
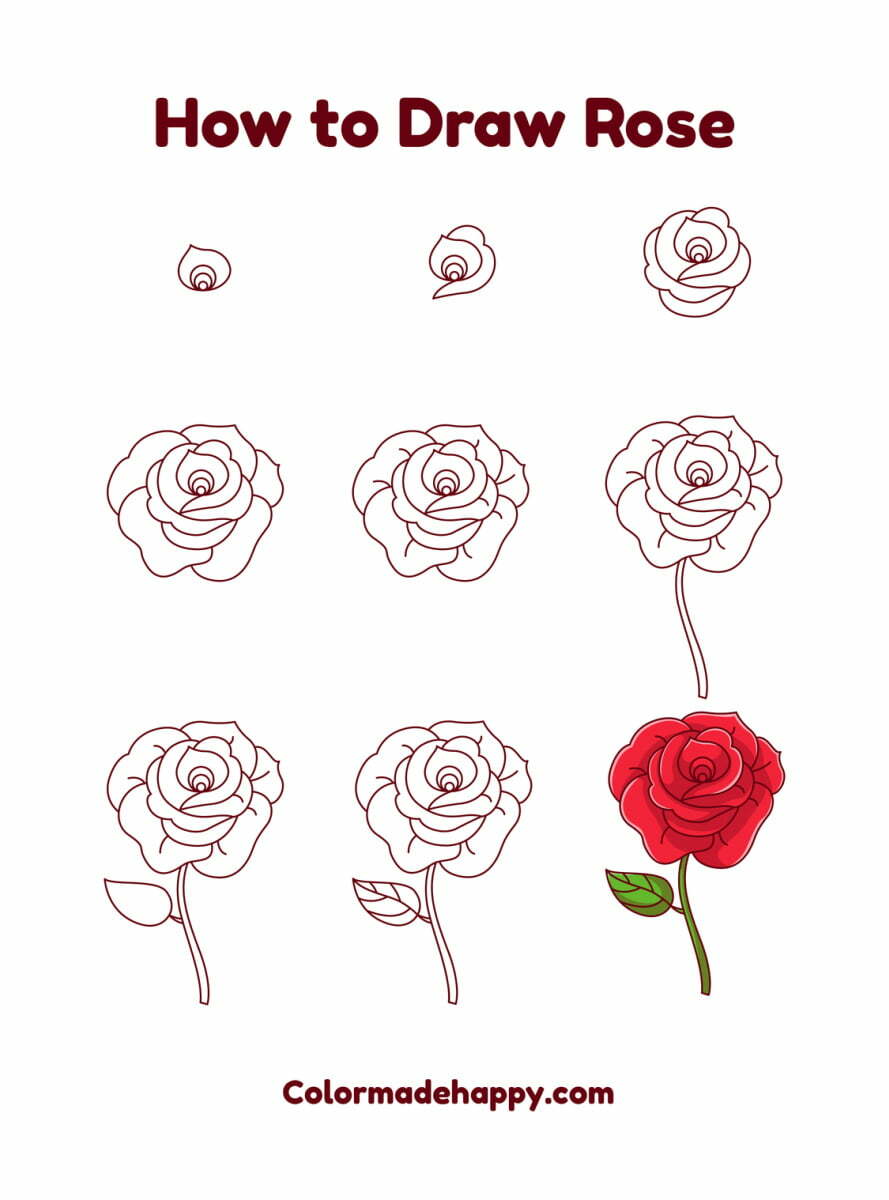
Credit: colormadehappy.com
Common Mistakes
Drawing a rose can be simple and fun. Many beginners face common mistakes that slow progress. Understanding these errors helps improve your skills. Focus on key areas to avoid frustration and create beautiful roses.
Avoiding Overcrowded Petals
Too many petals make your rose look messy. Space petals evenly. Let each petal have room to shine. Overcrowding hides the shape and beauty of the rose. Keep petals clear and distinct.
Maintaining Proportions
Proportion keeps your rose realistic. Large petals with small stems look odd. Measure petals and stem size carefully. Balanced proportions give your rose a natural look. Use light guidelines to keep everything in scale.
Keeping Lines Clean
Clean lines give your drawing a polished feel. Avoid heavy or shaky strokes. Use smooth, confident lines for petals and stem. Erase extra marks gently to keep the paper neat. Clean lines make your rose easier to color or shade.
Practice Exercises
Practice is key to drawing a beautiful rose. Exercises help improve your skills step by step. Regular practice builds confidence and sharpens your hand movements. Try different methods to find what suits you best. Focus on simple drills to stay motivated and see steady progress.
Quick Sketch Drills
Set a timer for one to three minutes. Draw quick rose sketches without worrying about details. Capture the basic shape and flow of petals fast. Repeat these drills to train your hand to draw fluid lines. This helps develop speed and reduces hesitation in your strokes.
Timed Drawing Sessions
Increase your drawing time gradually. Start with five minutes and work up to fifteen. Use this time to add more detail to your rose sketches. Focus on shading and petal layers. Timed sessions encourage focus and help you manage drawing time effectively.
Using Reference Photos
Find clear photos of roses from different angles. Study the shape, curves, and petal arrangement carefully. Try to recreate what you see on paper. Reference photos guide your hand and improve accuracy. They also inspire creativity by showing natural variations in roses.
Frequently Asked Questions
How Do I Start Drawing A Rose Step By Step?
Begin by sketching a loose circle for the rose’s base. Then, draw a small spiral inside to form the petals. Add layers of curved petals around the spiral, gradually expanding outward to create a natural look.
What Tools Are Best For Drawing A Rose?
Use pencils for sketching and shading, preferably HB and 2B. Fine-tip pens help add details. For coloring, colored pencils or watercolors work well to bring the rose to life.
How Can I Make My Rose Drawing Look Realistic?
Focus on petal shapes and shading. Add soft gradients to show light and shadow. Use reference photos to capture natural petal curves and subtle color variations.
How Long Does It Take To Draw A Rose?
For beginners, it may take 20 to 40 minutes. With practice, you can complete a detailed rose in 10 to 15 minutes. Time varies based on complexity and skill level.
Conclusion
Drawing a rose can be simple with clear steps. Practice each part slowly to improve your skills. Use light lines first, then add details carefully. Don’t worry about mistakes; they help you learn. Keep trying and enjoy the process of creating art.
Soon, your rose drawings will look beautiful and natural. Drawing brings joy and calmness—keep your pencil moving!