Tying a bow tie might seem tricky at first, but once you master it, you’ll instantly elevate your style and confidence. Whether it’s for a wedding, a formal event, or just to stand out with a touch of classic charm, knowing how to tie a bow tie puts you in control of your look.
Imagine stepping into any room knowing your bow tie is perfectly shaped—sharp, stylish, and just the right fit. Ready to learn the simple steps that will make tying a bow tie second nature? Keep reading, and you’ll be impressing everyone with your polished, timeless style in no time.

Credit: www.oliverwicks.com
Bow Tie Basics
Tying a bow tie starts with understanding the basics. Knowing the types, fabrics, and occasions helps you choose the perfect bow tie. This knowledge makes tying easier and the result more stylish.
Bow ties come in many styles and materials. Each choice changes the look and feel of your outfit. Learn the essentials to wear a bow tie confidently.
Types Of Bow Ties
Bow ties come in three main types: pre-tied, clip-on, and self-tie. Pre-tied bow ties are already shaped and easy to wear. Clip-ons fasten quickly without tying. Self-tie bow ties offer the classic look but require practice to tie. Most fashion experts prefer self-tie for its charm and style.
Choosing The Right Fabric
Fabric affects the bow tie’s texture and appearance. Silk is smooth and shines, perfect for formal events. Cotton or linen works well for casual or summer wear. Wool or velvet gives a warm, rich look for cooler seasons. Pick fabric based on comfort and the event’s tone.
Occasions To Wear A Bow Tie
Bow ties fit many occasions. Formal events like weddings, galas, and black-tie dinners call for classic silk bow ties. Casual or creative workplaces allow cotton or patterned bow ties. Fun parties or themed events are great for colorful and bold styles. Choose your bow tie to match the event’s mood and dress code.

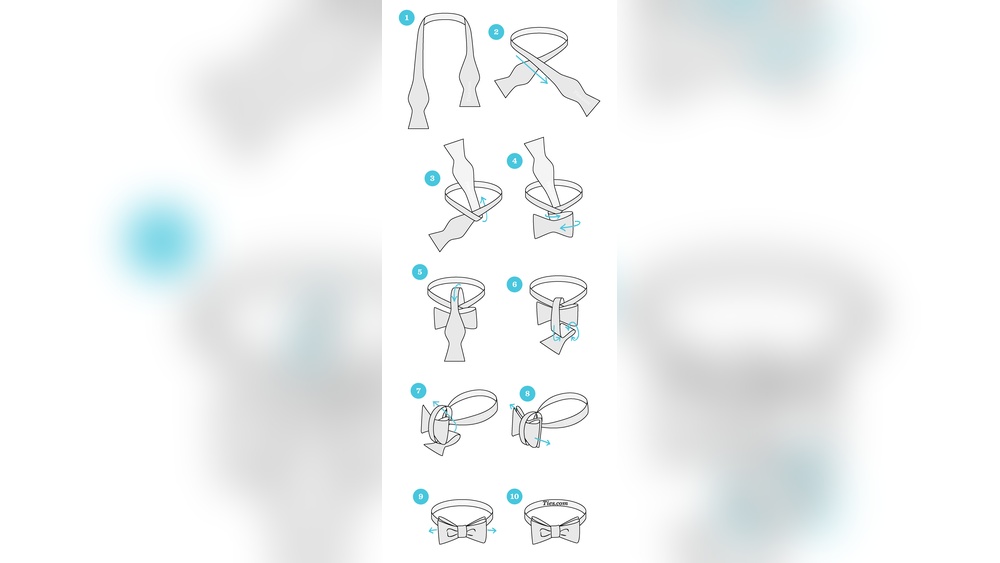
Credit: www.wikihow.com
Preparing Your Bow Tie
Preparing your bow tie is the first step to a sharp and polished look. This stage sets the foundation for a neat and comfortable fit. A well-prepared bow tie ensures ease during the tying process and helps maintain the shape throughout your event.
Adjusting The Length
Start by adjusting the length of your bow tie. Most bow ties have a slider to change their size. Measure the tie against your neck to find a comfortable fit. The length should match your neck size closely but not feel tight. Proper length helps the bow sit evenly on both sides. Too long or short ties can cause uneven bows and discomfort.
Positioning Around The Collar
Place the bow tie around your collar with the ends hanging evenly. Ensure the collar is fully buttoned for better support. The bow tie should rest right below the Adam’s apple. Keep the tie flat and smooth to avoid wrinkles. Proper positioning makes the tying process easier and the bow look balanced.
Step-by-step Bow Tie Tying
Tying a bow tie may seem tricky at first. Step-by-step guidance makes it simple. Follow these clear instructions to tie a perfect bow tie every time. Practice helps build confidence and skill.
Creating The Initial Cross
Start by placing the bow tie around your neck. One end should hang about 1.5 inches longer. Cross the longer end over the shorter end. Hold the intersection firmly. This cross forms the base of your knot.
Forming The Bow Shape
Fold the shorter end horizontally to make a bow shape. Hold this fold at the neck. Drop the longer end straight down over the center of the bow. This forms the middle knot area. Prepare to loop the longer end behind the bow.
Securing The Knot
Fold the longer end back towards your chest. Push it through the small loop behind the bow. Pull gently to tighten the knot. The bow tie begins to take shape. Hold both ends steady as you adjust.
Adjusting For Symmetry
Look carefully at both bow ends. Adjust the folds to make them even. Tighten or loosen the knot slightly for balance. Make sure the bow tie sits flat and neat. Perfect symmetry completes a sharp, polished look.
Common Mistakes To Avoid
Tying a bow tie can be tricky at first. Many people make small errors that affect the final look. Avoiding these common mistakes helps you wear your bow tie with confidence and style. Pay close attention to the details for a neat and polished finish.
Uneven Loops
Uneven loops make the bow tie look sloppy. Both sides should be the same size and shape. Take your time to adjust the loops before tightening the knot. Use a mirror to check for balance from different angles.
Loose Knots
A loose knot causes the bow tie to droop and lose shape. Pull the knot firmly but gently to keep it secure. Avoid over-tightening, which can wrinkle the fabric. A snug knot holds the bow tie in place all day.
Wrong Length Settings
Setting the wrong length makes the bow tie too long or too short. Adjust the strap so the bow tie fits your neck size perfectly. The ends should meet evenly without extra slack. Proper length keeps the bow tie comfortable and stylish.
Styling Tips
Styling a bow tie adds charm and personality to your outfit. It can change the entire look from formal to casual in seconds. Knowing how to style your bow tie helps you wear it with confidence and ease.
Pairing With Shirts And Suits
Choose a shirt with a collar that holds the bow tie well. Spread collars and wingtip collars work best for bow ties. Match the bow tie color with your suit for a balanced look. Dark suits go well with bold or classic bow ties. Light suits pair nicely with pastel or patterned bow ties.
Using Bow Ties For Casual Looks
Bow ties are not just for formal events. Wear one with a button-down shirt and chinos for a smart casual look. Try a knitted or cotton bow tie for a relaxed style. Pair with rolled-up sleeves or suspenders to add fun and flair. Casual bow ties show your unique fashion sense.
Adding Accessories
Complement your bow tie with matching pocket squares or cufflinks. Keep accessories simple to avoid a cluttered look. A classic watch or a subtle lapel pin enhances elegance. Use patterns in accessories to add texture, but keep colors coordinated. Small details make your outfit stand out.
Alternative Bow Tie Knots
Bow ties add charm and style to any outfit. Besides the classic knot, many alternative bow tie knots offer unique looks. These knots suit different occasions and personal tastes. Learning a few can make dressing up more fun and creative.
Simple Bow Tie Knot
The simple bow tie knot is easy to tie and looks neat. It suits beginners who want a quick, elegant style. This knot creates a small, tidy bow perfect for casual and formal events.
Start by crossing one end over the other. Loop and pull to form a simple bow shape. Adjust the loops until balanced and comfortable.
Double Bow Tie Knot
The double bow tie knot adds extra flair with a layered look. It looks fuller and gives a bold statement. This knot is great for special events or when you want to stand out.
Make a simple bow first. Then fold one loop over the other and tighten. The result is a thicker bow with two visible layers.
Butterfly Knot
The butterfly knot is a classic shape, wider and more rounded than others. It suits most bow tie styles and formal wear. The shape resembles butterfly wings, adding elegance to your outfit.
Tie a simple bow first. Shape the loops to be wider and rounder. Adjust the ends to create smooth, curved edges like butterfly wings.
Maintaining Your Bow Tie
Maintaining your bow tie keeps it looking sharp and lasting longer. Proper care helps preserve its shape and fabric quality. Small habits can make a big difference in your bow tie’s appearance over time.
Follow these simple tips to keep your bow tie fresh and ready for every occasion.
Cleaning Tips
Check the label for fabric care instructions before cleaning. Most silk bow ties need dry cleaning only. Cotton or polyester ties can be hand washed gently with mild soap. Avoid harsh detergents and hot water to prevent damage. Air dry your bow tie flat to keep its shape. Iron on low heat if necessary, using a cloth between the iron and fabric.
Storage Recommendations
Store your bow tie in a cool, dry place away from sunlight. Use a tie rack or hang it to avoid wrinkles. Folding your bow tie loosely can prevent creases. Keep it away from sharp objects that might snag the fabric. A small box or pouch can protect it during travel.
When To Replace
Replace your bow tie if it shows signs of wear or damage. Look for frayed edges, loose threads, or stains that won’t come out. Faded colors can make your bow tie look old and dull. If the fabric feels stiff or brittle, it may be time for a new one. A fresh bow tie keeps your outfit looking polished and stylish.
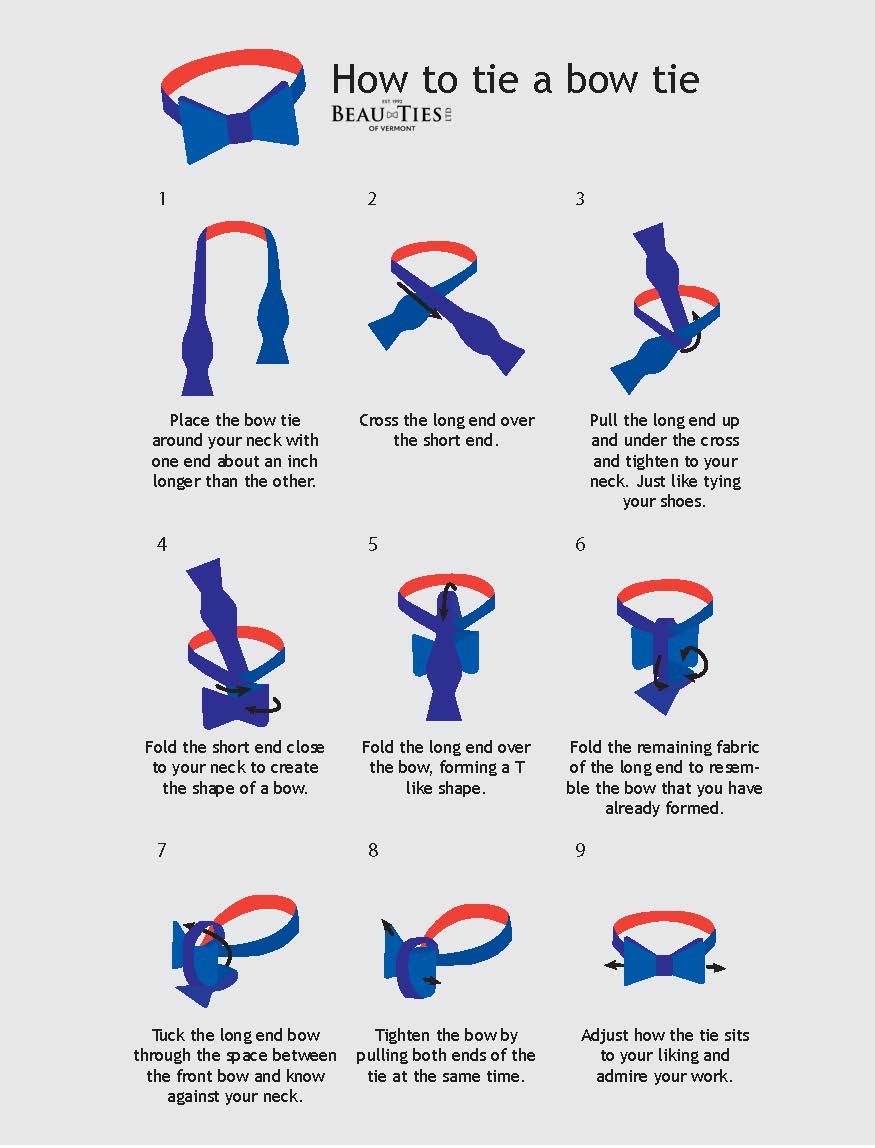
Credit: www.beautiesltd.com
Frequently Asked Questions
What Is The Easiest Way To Tie A Bow Tie?
The easiest way to tie a bow tie is to start with the bow shape, loop one side, cross and tuck the other side through the loop, then adjust. Practice helps achieve a neat, balanced look quickly.
How To Tie A Bow On A Dress?
To tie a bow on a dress, create a loop with the sash. Cinch it, then fold the pink down and tuck it under. Pull it through the gap between the loop and sash. Tighten and adjust the bow for a neat finish.
How To Tie A Bow With A Knot?
Cross the two ends, form a loop with one side, wrap the other around, pull through the gap, and tighten to shape the bow.
What Is The Most Beautiful Tie Knot?
The Half Windsor knot is the most beautiful for its balanced symmetry and medium size. It suits most occasions elegantly.
Conclusion
Tying a bow tie takes practice but is simple to learn. Follow each step slowly and repeat as needed. Soon, you will tie a neat bow without help. A well-tied bow tie adds style and confidence to your look. Enjoy wearing it to special events or casual outings.
Keep practicing, and you’ll improve every time.