Want to capture exactly what’s on your Mac screen but don’t know how? Taking a screenshot, or “ss” as many call it, is easier than you think.
Whether you want to save a funny moment, keep important info, or share your screen with friends, knowing the right shortcuts and tools on your Mac makes all the difference. In this guide, you’ll discover simple, step-by-step ways to snap your screen quickly and even troubleshoot common problems if screenshots aren’t working.
Stick with me, and you’ll be a Mac screenshot pro in no time!
Screenshot Shortcuts
Screenshot shortcuts on a Mac make capturing your screen quick and easy. These built-in commands save time and effort. You do not need extra software. Just press the right keys and your screenshot is ready. Below are the main ways to take screenshots using shortcuts.
Capture Full Screen
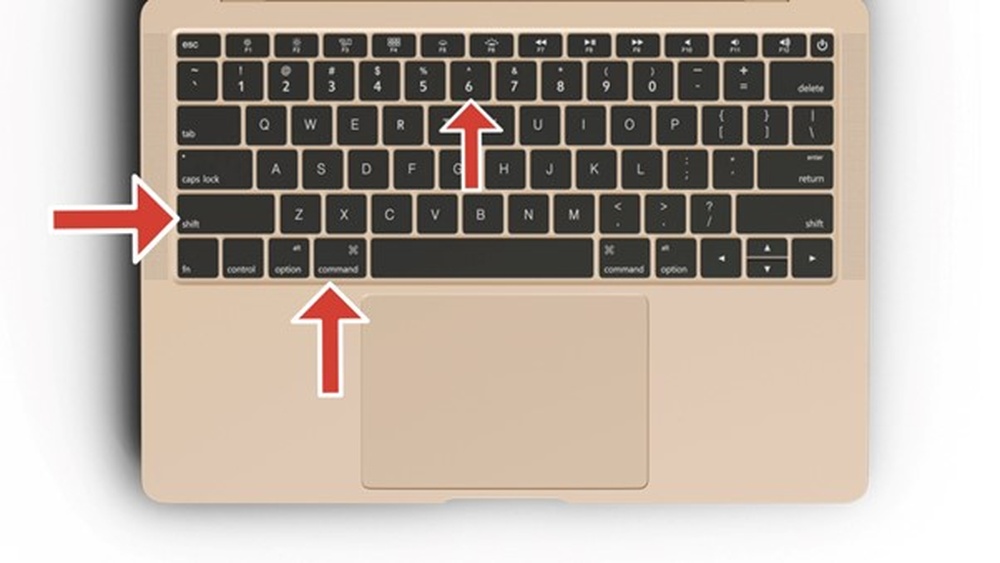
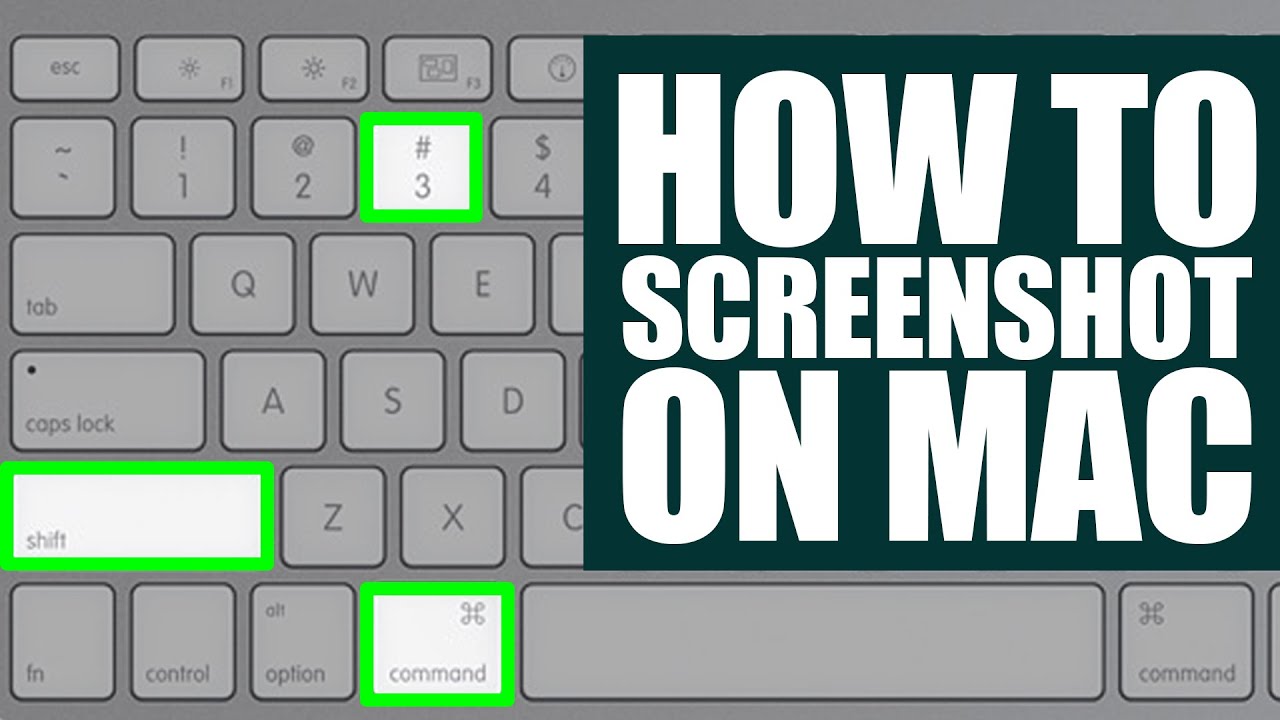
Press Command (⌘) + Shift + 3 to capture the entire screen. Your Mac saves the screenshot as a PNG file on the desktop. This shortcut works with one or multiple monitors. It captures everything visible on your screen instantly.
Select Portion
Press Command (⌘) + Shift + 4 to select a portion of the screen. Your cursor changes to a crosshair. Click and drag to choose the area you want. Release the mouse button to save the screenshot. This method is great for capturing specific parts only.
Capture Specific Window
Press Command (⌘) + Shift + 4, then hit the Spacebar. The cursor changes to a camera icon. Move it over any open window to highlight it. Click the window to capture it. The screenshot will include the window’s shadow and save to the desktop.

Credit: www.wikihow.com
Using The Screenshot App
The Screenshot app on Mac is a simple tool to capture your screen. It offers more options than keyboard shortcuts. You can choose to capture the entire screen, a window, or a selected portion. The app also allows you to set timers and pick where to save your screenshots. This section explains how to use the Screenshot app effectively.
Accessing The Toolbar
Press Shift + Command + 5 to open the Screenshot toolbar. The toolbar appears at the bottom of your screen. It shows icons for different capture modes and options. You can also open this app from the Launchpad or Spotlight search.
Choosing Capture Options
The toolbar has three main capture buttons. The first captures the entire screen. The second lets you capture a selected window. The third captures a custom portion of the screen. Click any icon to choose your preferred capture mode.
Setting Timers And Save Location
Click the “Options” button on the toolbar for more settings. You can set a timer of 5 or 10 seconds. This delay helps you prepare your screen before capture. You can also choose where to save your screenshot. Options include the desktop, clipboard, or a folder.
Taking The Screenshot
After selecting options, click the “Capture” button or press Enter. Your Mac takes the screenshot based on your chosen settings. A small thumbnail appears at the screen corner. Click it to edit or wait to save automatically.
Editing Screenshots
Editing screenshots on a Mac is simple and fast. After capturing an image, you can quickly adjust it to fit your needs. The Mac provides easy tools to crop, mark up, save, and share your screenshots. These features help you highlight important details or remove unwanted parts. Let’s explore how to use these editing options effectively.
Using The Thumbnail Preview
Right after taking a screenshot, a small thumbnail appears at the screen corner. Click this thumbnail to open the editing window. It gives quick access to tools without opening other apps. You can use this preview to make instant changes. If you ignore it, the screenshot saves automatically to your desktop.
Cropping And Marking Up
The editing window offers cropping tools to cut out unwanted areas. Drag the corners to select the part you want to keep. Mac also lets you add text, shapes, and arrows. Use the pen or highlighter to draw on the screenshot. These tools help you explain or point out details clearly.
Saving And Sharing
After editing, click Done to save the changes. The screenshot saves as a PNG file on your desktop or chosen folder. You can also click the share button to send it by email, message, or social media. This makes it easy to share your edited screenshots with others quickly.
Credit: www.youtube.com
Troubleshooting Tips
Taking screenshots on a Mac is simple but sometimes issues occur. These problems can stop your Mac from saving or capturing screenshots correctly. Troubleshooting helps fix these common errors fast. Follow these tips to solve screenshot troubles and get back to work.
Restarting Your Mac
Restarting your Mac can clear temporary glitches. It refreshes system processes and keyboard functions. Save any open files and click the Apple menu. Choose “Restart” and wait for your Mac to reboot. Try taking a screenshot again after restarting.
Checking Keyboard Settings
Incorrect keyboard settings can block screenshot shortcuts. Open System Preferences and select Keyboard. Click on the Shortcuts tab. Make sure “Screenshots” shortcuts are enabled and not changed. Reset any custom shortcuts that might conflict. Test the screenshot keys once settings are correct.
Verifying Save Locations
Screenshots save to a default folder on your Mac. Sometimes, this folder changes or becomes inaccessible. Open Finder and check the Desktop or the Pictures folder. Search for recent screenshot files using “.png” extension. Reset the save location using the Screenshot app’s Options menu.
Managing Dropbox Interference
Dropbox may automatically capture screenshots and interfere. This can stop Mac from saving screenshots normally. Open Dropbox preferences and find the “Import” or “Backups” tab. Disable the option to save screenshots to Dropbox. After this, your Mac should save screenshots locally again.
Advanced Fixes
Advanced fixes help solve persistent screenshot problems on Mac. These methods go beyond basic troubleshooting. They target deeper settings and system processes. Follow these steps carefully to restore screenshot functions quickly.
Resetting Nvram
NVRAM stores settings your Mac uses quickly. Sometimes, corrupted NVRAM causes screenshot issues. Resetting it can clear glitches affecting screenshots.
To reset NVRAM, shut down your Mac. Turn it on and immediately press Option + Command + P + R keys. Hold keys for about 20 seconds. Release keys and let Mac restart normally.
Check if screenshots work after restart. Resetting NVRAM often fixes hidden software conflicts.
Adjusting Privacy Settings
Mac controls app access to screen content for privacy. Sometimes screenshot tools lose permission. Adjusting these settings can fix capture problems.
Open System Preferences and go to Security & Privacy. Click Privacy tab, then select Screen Recording. Check that the Screenshot app or related tools have permission. If not, click the lock icon, enter your password, and enable permission.
Restart the app or Mac to apply changes. This step ensures apps can capture your screen without restriction.
Restarting Screenshot Processes
Screenshot features rely on system processes running smoothly. Sometimes these processes hang or crash. Restarting them can restore screenshot functionality.
Open Terminal and type killall SystemUIServer. Press Enter. This command restarts the system user interface server which controls screenshot shortcuts.
Alternatively, restart the Mac for a full refresh. Restarting processes clears temporary bugs affecting screenshots.

Credit: democreator.wondershare.com
Alternative Screenshot Methods
Screenshots on a Mac do not rely only on keyboard shortcuts. Alternative methods exist to capture your screen easily. These options offer more control and editing features for your images.
Explore how to use built-in apps and third-party tools for better screenshot experiences. These methods can save time and improve your workflow.
Using Preview App
The Preview app on Mac can capture screenshots without shortcuts. Open Preview, then go to the File menu and select “Take Screenshot.”
Choose from options like “From Selection,” “From Window,” or “From Entire Screen.” After capturing, the image opens directly in Preview. You can edit, annotate, or save it in different formats.
This method is useful if you want to edit the screenshot immediately. It also helps users unfamiliar with keyboard commands.
Third-party Tools
Many third-party apps offer advanced screenshot features. Tools like Snagit, Lightshot, or Monosnap provide options for annotations, delayed captures, and easy sharing.
These apps often include video recording and cloud storage integration. They are ideal for users needing more than basic screenshots.
Installing a third-party tool can improve productivity. Choose one that fits your needs and budget for the best results.
Preventing Screenshot Issues
Taking screenshots on a Mac is simple, but sometimes issues can stop the process. Preventing these problems saves time and frustration. A few easy steps keep screenshot tools working well. This section explains how to avoid common screenshot issues on your Mac.
Keeping Macos Updated
macOS updates include fixes for bugs and errors. These updates improve screenshot functions and system stability. Check for updates regularly to keep your Mac running smoothly. Installing the latest version can solve many screenshot problems. Open System Preferences and click Software Update to check for new versions.
Regular Keyboard Shortcut Checks
Keyboard shortcuts control how screenshots are taken on a Mac. Sometimes shortcuts get changed or disabled by apps or settings. Test your shortcuts often to make sure they still work. You can find default screenshot shortcuts in System Preferences under Keyboard. Reset shortcuts if they do not respond or conflict with other commands.
Frequently Asked Questions
How To Take A Screenshot On Mac?
Press Command + Shift + 3 to capture the entire screen. Use Command + Shift + 4 to select a portion. Press Command + Shift + 4, then Spacebar to capture a window. Screenshots save automatically on your desktop as PNG files.
Why Can’t I Take A Ss On Mac?
You can’t take a screenshot on Mac if shortcuts are disabled, save location is incorrect, or apps like Dropbox block it. Restart your Mac, check keyboard and privacy settings, or reset NVRAM to fix the issue.
How Do You Snip And Paste On A Mac?
To snip and paste on a Mac, press Command + Shift + 4 to capture a selected area. Then press Command + V to paste it.
How Do You Get To Screenshots On A Mac?
Open Finder, click “Go” in the menu, then select “Go to Folder. ” Type ~/Library/Application Support/com. apple. screencapture/ to access Screenshots. Alternatively, find screenshots saved on your Desktop by default after capturing them.
Conclusion
Taking screenshots on a Mac is simple and quick. Use keyboard shortcuts or the Screenshot app for best results. Choose full screen, a window, or a specific area to capture. Edit your screenshots easily with the thumbnail preview. If problems arise, check your settings or restart your Mac.
Practice these steps to capture exactly what you need. Now, you can save and share your screen images with confidence.