Want to capture exactly what’s happening on your Mac screen? Whether you’re creating a tutorial, saving a memorable video call, or troubleshooting an issue, knowing how to screen record on your Mac can be a real game changer.
You might think it’s complicated, but it’s actually quick and simple once you know the right steps. In this guide, you’ll discover easy methods to record your entire screen or just a portion of it, with or without sound. By the end, you’ll have all the tools you need to create sharp, professional screen recordings that serve your purpose perfectly.
Ready to get started? Let’s dive in.
Credit: www.hellotech.com
Screen Recording Tools On Mac
Mac computers offer built-in tools to record your screen easily. These tools help capture videos for tutorials, presentations, or sharing gameplay. The two main options are the Screenshot Toolbar and QuickTime Player. Both are simple and require no extra software.
Each tool has unique features. The Screenshot Toolbar is quick and versatile. QuickTime Player offers more control for longer recordings. Understanding these tools makes screen recording on Mac smooth and efficient.
Screenshot Toolbar Features
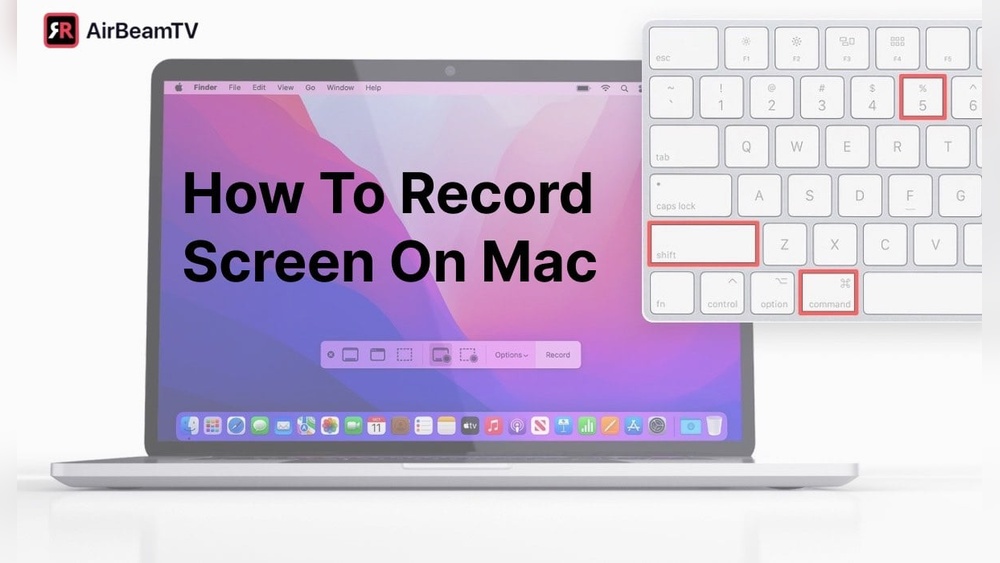
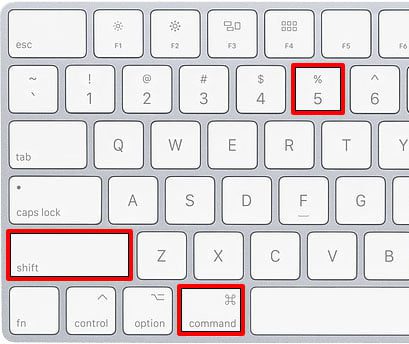
The Screenshot Toolbar appears by pressing Shift + Command + 5. It shows options for screen capture and recording. You can record the entire screen or just a part. The toolbar also lets you take screenshots.
Click “Options” to set where files save. You can choose to include microphone audio. There is an option to show mouse clicks during recording. Press “Record” to start and use the stop button in the menu bar to end.
After stopping, a thumbnail pops up for quick editing or saving. If you ignore it, the video saves automatically to your Desktop. This toolbar is fast and perfect for short clips or quick tasks.
Quicktime Player Recording
QuickTime Player is a classic Mac app found in the Applications folder. Open it and select File > New Screen Recording to start. You can also press Control + Command + N for a shortcut.
QuickTime lets you pick the screen area to record and whether to use a microphone. It offers a simple interface with basic controls. Press “Record” to begin and stop with the menu bar button.
QuickTime saves recordings automatically. You can trim or export files in different formats. This tool is ideal for longer or more detailed videos. It supports easy sharing and editing.
Steps To Record Screen Using Screenshot Toolbar
The Screenshot toolbar on Mac offers a simple way to record your screen. It gives control over what and how you record. Follow these clear steps to capture videos of your screen quickly and easily.
Selecting Recording Mode
Open the Screenshot toolbar by pressing Shift + Command + 5. You will see options for screen capture and recording. Choose either “Record Entire Screen” or “Record Selected Portion.”
Selecting the right mode helps capture exactly what you need. Use full screen to record everything or select an area to focus on a part of your screen.
Setting Options And Preferences
Click the “Options” button on the toolbar to customize your recording. Set the save location so you know where your file will be stored. Choose a timer delay if you want to prepare before recording starts.
Turn on the microphone to add voice narration. Enable “Show Mouse Clicks” to highlight clicks during recording. These settings improve your video’s clarity and usefulness.
Starting And Stopping Recording
After selecting your mode and options, click the “Record” button. If you chose a selected portion, drag to highlight the area to record. Your Mac will begin recording immediately.
To stop, click the Stop icon in the menu bar at the top of your screen. This icon looks like a square inside a circle. Stopping ends the recording and saves your video.
Saving And Editing Recordings
When you stop recording, a thumbnail preview appears briefly in the corner of your screen. Click the thumbnail to open quick editing tools. Trim the video or save it to your preferred location.
If you do not click the thumbnail, the recording saves automatically to the chosen folder, often the Desktop. Editing after saving is possible using other apps if needed.
Recording With Quicktime Player
QuickTime Player is a simple tool for screen recording on Mac. It comes pre-installed on all Macs, so no extra downloads are needed. You can capture your entire screen or just a part of it. This tool also lets you record audio from your microphone. The process is quick and user-friendly, perfect for beginners.
Opening Quicktime And Starting Recording
Open QuickTime Player from the Applications folder. Click on “File” in the menu bar. Select “New Screen Recording” from the dropdown. A small recording window will appear on your screen. Click the red record button to start.
Choosing Screen Area And Audio Input
After clicking record, you can choose to record the full screen or drag to select a part. To record your voice or other sounds, click the arrow next to the record button. Choose your microphone from the list. This lets you add audio to your video easily.
Stopping And Saving The Video
To stop recording, click the stop button in the menu bar at the top. QuickTime will open the video automatically for preview. Click “File” and then “Save” to keep your video. Choose a name and location for easy access later.
Credit: www.avast.com
Adding Audio To Screen Recordings
Adding audio to your screen recordings makes them more informative and engaging. It helps viewers hear your voice or system sounds clearly. Whether you explain a tutorial or record gameplay, good audio improves the overall experience.
Mac offers built-in options to capture sound from your microphone. You can also use external tools to enhance audio quality. Both methods are simple and effective for different needs.
Selecting Microphone Input
To record your voice, choose the right microphone input before starting. Use the Screenshot Toolbar by pressing Shift-Command-5. Click Options and select your microphone under the Microphone section. This setting lets QuickTime or the Screenshot tool capture your voice during recording.
Make sure your microphone is connected and working. Test it by speaking and watching the input level. Adjust the volume if needed in System Preferences under Sound settings.
Using External Audio Tools
For higher audio quality, consider external audio tools. Apps like GarageBand or Audacity allow you to record and edit sound separately. You can then sync this audio with your screen video using video editing software.
Use a good external microphone or headset for clear sound. Connect it to your Mac and select it as the input device. This method is ideal for podcasts, professional tutorials, or presentations requiring crisp audio.
Keyboard Shortcuts For Screen Recording
Keyboard shortcuts simplify screen recording on Mac. They save time and avoid menu navigation. Using shortcuts makes recording faster and smoother.
Mac offers built-in shortcuts to start, stop, and manage recordings. These keys help users work efficiently without distraction. Learn the essential shortcuts for better control.
Starting And Stopping Recordings
Press Shift + Command + 5 to open the screen recording toolbar. This toolbar lets you record the entire screen or a selected area. Click the record button or press Return to start recording.
To stop recording, press Command + Control + Esc or click the stop icon in the menu bar. The recording saves automatically to your desktop or chosen folder.
Force Quitting Apps
Sometimes, apps freeze during recording. Use Command + Option + Escape to open the Force Quit window. Select the frozen app and click “Force Quit” to close it immediately.
This shortcut helps keep your Mac responsive while recording. It prevents crashes and data loss during important screen captures.
Tips For Perfect Screen Recordings
Perfect screen recordings require simple but effective tips. These tips help create clear and useful videos. Following them ensures your recordings look professional and easy to watch. Focus on what matters most during your screen capture process.
Choosing Recording Area Wisely
Select only the part of the screen you need to record. Recording the entire screen can distract viewers from the main content. Use the Mac’s built-in tool to drag and select a specific area. This keeps the video focused and reduces file size. It also helps viewers understand the important parts quickly.
Managing File Locations
Set a clear folder for your screen recordings before starting. This avoids confusion when looking for your files later. The Mac Screenshot toolbar lets you choose the save location easily. Pick a folder you check often, like Desktop or Documents. Organizing files saves time and keeps your work neat.
Using Mouse Click Visuals
Show mouse clicks in your recordings to guide viewers better. This feature highlights where you click during the video. It makes tutorials and demonstrations easier to follow. Enable “Show Mouse Clicks” in the recording options on Mac. Small circles or animations around clicks catch attention without being distracting.

Credit: www.hollyland.com
Frequently Asked Questions
How Do You Record Your Screen On A Mac?
Open the Screenshot toolbar with Shift-Command-5. Choose to record the entire screen or a selected portion. Click Record to start, then click the Stop button in the menu bar to finish. Save the file from the thumbnail or find it on the Desktop.
How Do I Record Video With Sound On My Mac?
Open the Screenshot toolbar with Shift-Command-5. Select screen recording mode, click Options, choose your microphone. Click Record to start, then Stop to finish. Save the video from the thumbnail or Desktop. Use QuickTime Player for alternative recording with sound.
How To Screen Record On Mac With Just Computer Audio?
Use macOS Screenshot Toolbar (Shift + Command + 5). Select screen recording mode and set audio input to “None. ” Install an audio loopback tool like BlackHole to capture only computer audio. Choose BlackHole as the sound output and start recording.
Stop to save the file with computer audio only.
How Do You Record Your Screen?
To record your screen on a Mac, open the Screenshot Toolbar with Shift-Command-5. Select full or partial screen recording. Click Record to start and the Stop button in the menu bar to end. Save or edit the video from the thumbnail preview.
Conclusion
Screen recording on a Mac is simple and useful. Use the Screenshot toolbar for quick access. QuickTime Player also offers flexible recording options. Choose the area you want to record, adjust settings, and start recording easily. Save your video to review or share later.
Practice a few times to get comfortable with the steps. Recording your screen can help with tutorials, presentations, or saving important content. Keep your Mac updated to access the latest features. Start recording today and capture exactly what you need.