Want to capture exactly what’s happening on your iPhone screen? Whether you’re creating tutorials, saving a game highlight, or sharing a quick how-to, screen recording can be a game-changer.
But if you’re unsure how to start, don’t worry—you’re just a few taps away from mastering this handy feature. In this guide, you’ll learn step-by-step how to screen record on your iPhone quickly and easily, including tips to add audio and find your recordings.
Ready to unlock this powerful tool and make your iPhone work even harder for you? Let’s dive in!
Enable Screen Recording
Enabling screen recording on your iPhone is the first step to capture your screen activities. It lets you save videos of tutorials, games, or any app usage. You need to add the screen recording feature to your Control Center to start quickly. Also, ensure your iOS version supports screen recording. Follow these steps to enable screen recording easily.
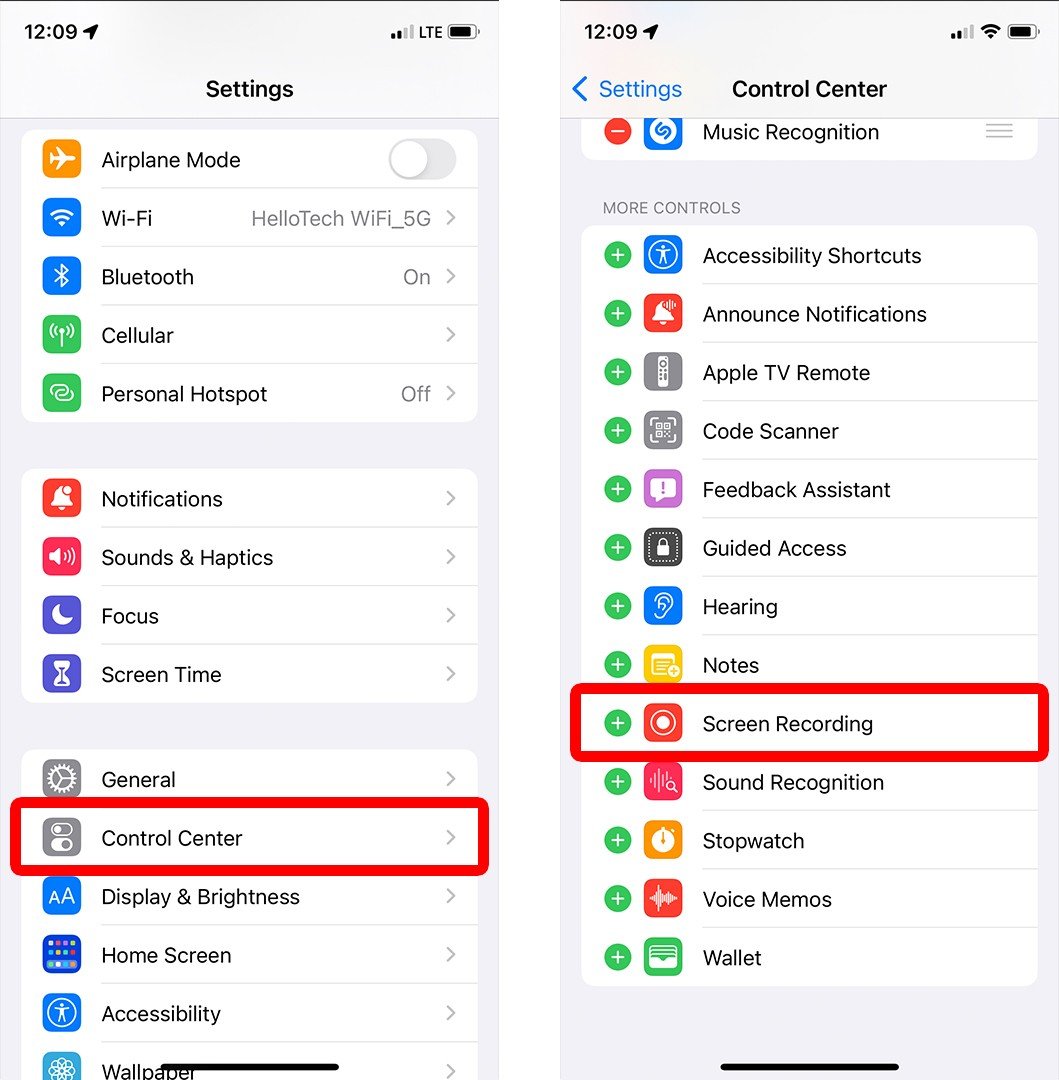
Add To Control Center
Open the Settings app on your iPhone. Scroll down and tap Control Center. Find Screen Recording in the list of controls. Tap the green plus (+) button next to it. This adds screen recording to your Control Center. Now, swipe down from the top-right corner of your screen. You will see the screen recording icon there. Tap it to start recording anytime.
Check Ios Version Compatibility
Screen recording requires iOS 11 or later. To check your iOS version, open the Settings app. Tap General, then About. Look for the Software Version. If it is below iOS 11, update your iPhone. Go to Settings > General > Software Update. Download and install the latest version. After updating, the screen recording feature will be available.
Start Recording
Starting a screen recording on your iPhone is simple and quick. It lets you capture exactly what happens on your screen, perfect for tutorials, games, or saving important moments. Follow these steps to begin recording right away.
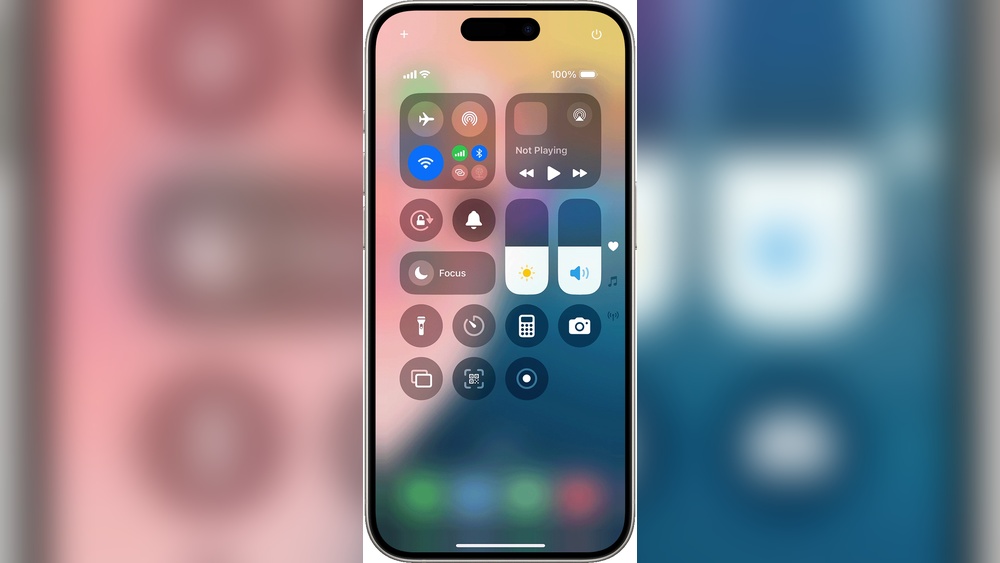
Open Control Center
Swipe down from the top-right corner of your screen. This opens the Control Center where quick settings live. On older iPhones, swipe up from the bottom edge instead. The Control Center gives you easy access to the screen recording feature.
Tap The Record Button
Look for the Record button, a circle inside another circle. Tap it once to start recording. You will see a red bar or red clock at the top, showing your screen is being recorded. To stop, tap this red bar or return to Control Center and tap the button again.
Use Microphone Audio
Press and hold the Record button in Control Center before you start. A menu appears with a microphone icon. Tap the microphone to turn audio on or off. When the microphone is on, it turns red. This lets you record your voice or background sounds along with the screen.
Stop Recording
Stopping your screen recording on an iPhone is simple and quick. The iPhone shows a clear sign that recording is active. You can end the recording in two easy ways. Both methods save your video automatically to the Photos app.
Tap The Red Status Bar
When you record your screen, a red bar appears at the top. This red bar shows that recording is in progress. To stop recording, just tap the red status bar. A message will pop up asking you to confirm. Tap “Stop” to end the recording immediately.
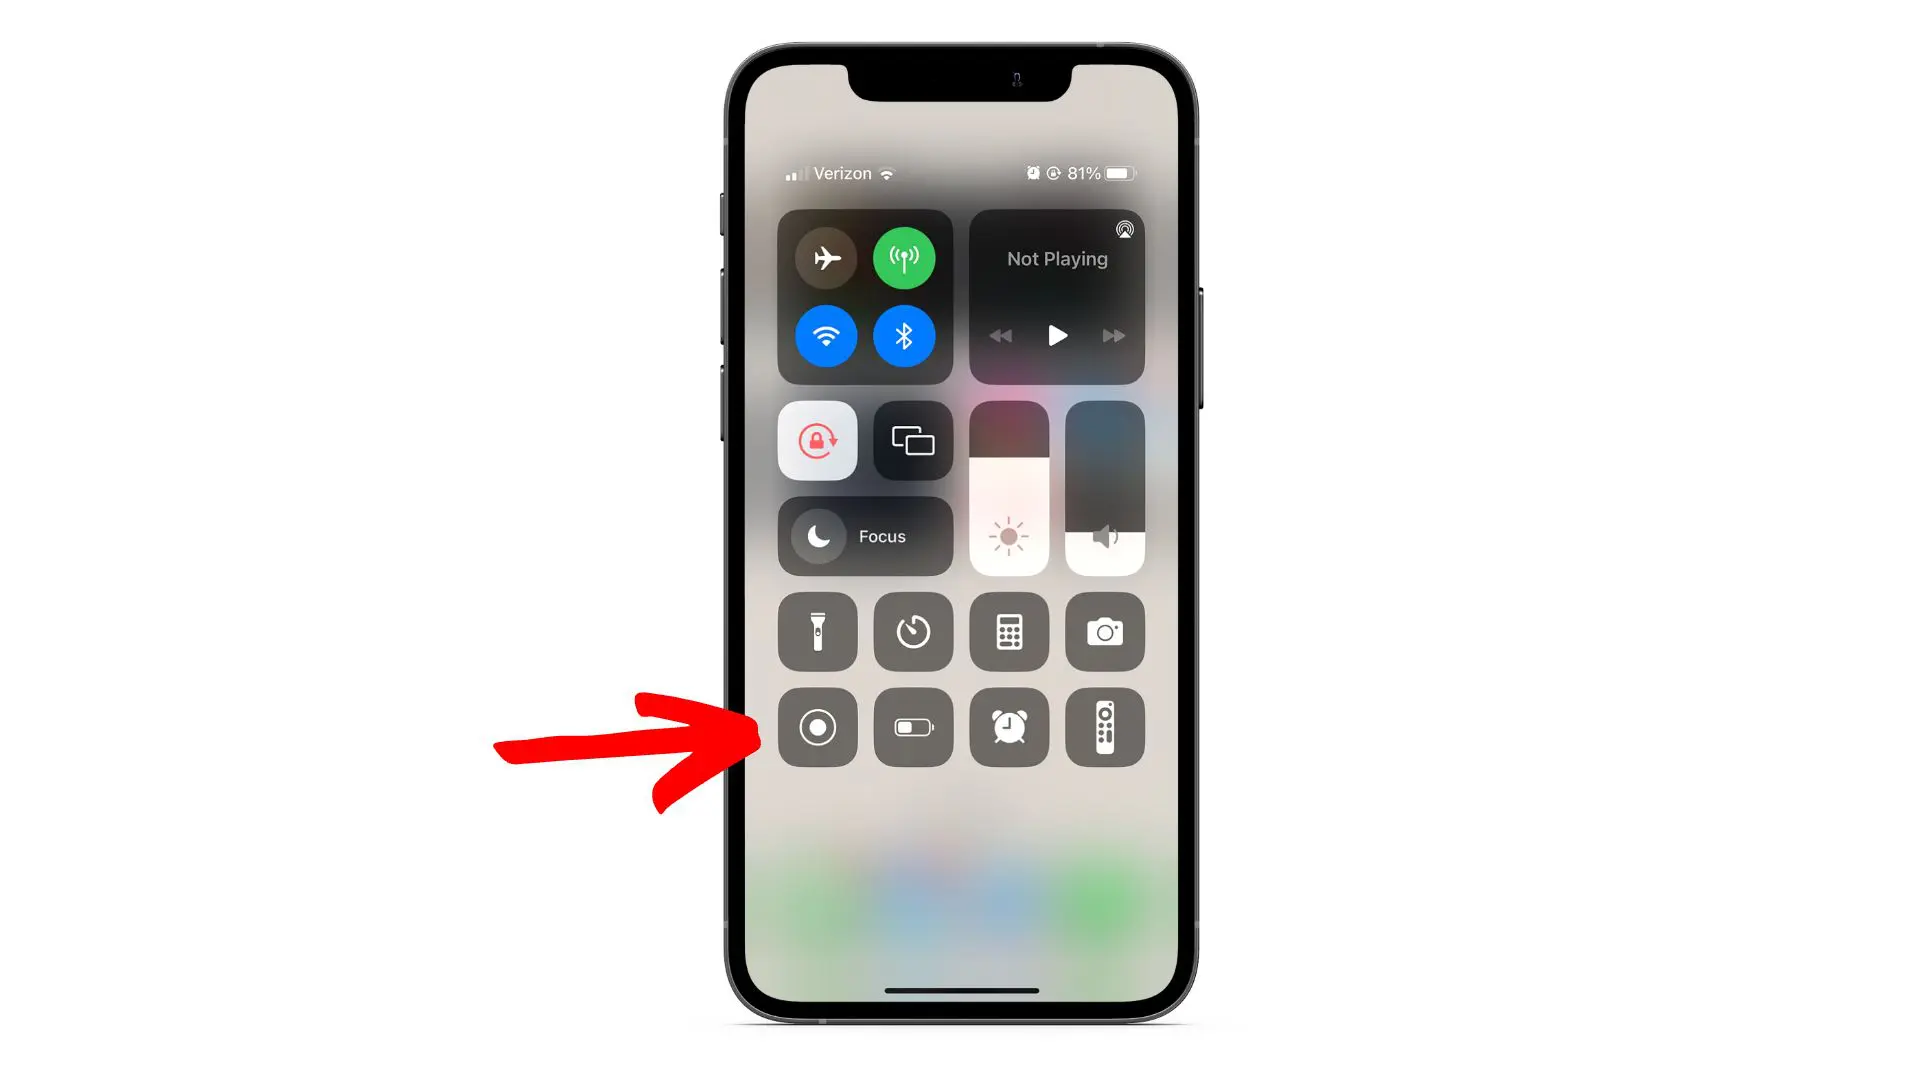
Stop From Control Center
You can also stop recording through the Control Center. Swipe down from the top-right corner of your screen to open it. Look for the red recording icon, which is a circle within a circle. Tap this icon to stop recording. Your screen recording will save automatically to your Photos app.
Credit: www.hellotech.com
Find And Edit Videos
After capturing your screen recording on iPhone, finding and editing your videos is simple. Your recordings save automatically to the Photos app. From there, you can easily locate and enhance them with built-in editing tools.
Locate In Photos App
Open the Photos app on your iPhone. Tap the “Albums” tab at the bottom. Scroll down to find the “Screen Recordings” album. All your screen recorded videos are stored here. Tap any video to view it. You can also find recordings in the main “Recents” album. This makes it easy to access your videos quickly.
Basic Editing Tools
Tap a video to open it. Then, tap “Edit” in the top right corner. Use the trim tool to cut unwanted parts at the beginning or end. Drag the handles on the timeline to select the section to keep. You can adjust brightness, contrast, and color by using the adjustment icons below. Tap “Done” to save your changes. Your edited video replaces the original, but you can revert anytime.
Troubleshooting Tips
Troubleshooting screen recording on your iPhone can save time and frustration. Simple fixes often solve common problems. Below are key tips to help you get your screen recording working smoothly again.
Screen Recording Not Working
First, check if Screen Recording is added to Control Center. Go to Settings > Control Center and look for Screen Recording in the list. If it is not there, tap the green plus button to add it. Restart your iPhone to refresh system functions. Make sure your iOS is up to date. Older versions may cause bugs with screen recording. Some apps block screen recording for privacy. Try recording a different app or your home screen to test.
Audio Issues
Tap and hold the Screen Recording button in Control Center to check microphone status. The microphone icon should be red if audio is on. If you hear no sound, try toggling the microphone off and on again. Check the volume level on your iPhone. Also, test the microphone with other apps like Voice Memos to confirm it works. Restart your device if audio problems persist during recording.
Storage Space
Screen recordings use storage quickly. Check your available space in Settings > General > iPhone Storage. Delete old videos, photos, or apps you no longer use. Offload apps without deleting data to save space. If storage is low, recordings may not save properly or fail to start. Consider backing up files to iCloud or a computer to free up space.
Credit: screenpal.com
Screen Recording Alternatives
Screen recording on an iPhone is simple with the built-in feature. Still, some users want other options. Alternatives help capture screen activity in different ways. These can provide extra functions or better quality. Explore these options to find what fits your needs best.
Third-party Apps
Several apps on the App Store offer screen recording features. They often include editing tools and special effects. Some apps allow recording with internal audio or add facecam overlays. These apps may require permissions to access your screen and microphone. Popular choices include DU Recorder and TechSmith Capture. Always check app reviews and privacy policies before downloading.
Using Mac For Iphone Recording
A Mac computer can record your iPhone screen using QuickTime Player. Connect your iPhone to the Mac with a Lightning cable. Open QuickTime Player and select “New Movie Recording.” Choose your iPhone as the camera source. This method records high-quality video without extra apps. It also lets you save recordings directly on your Mac. It is useful for tutorials or presentations.
Best Practices For Quality Videos
Creating clear and professional screen recordings on your iPhone requires more than just hitting the record button. Following best practices ensures your videos look polished and are easy to watch. Attention to detail before and during recording improves video quality significantly. Simple steps can prevent distractions and enhance the final result.
Prepare Your Screen
Close all apps that you do not need. Remove notifications and alerts. Clean your home screen of unnecessary icons. Organize the apps or content you want to show clearly. This keeps the focus on your main subject. A tidy screen helps viewers follow your video easily.
Use Do Not Disturb Mode
Turn on Do Not Disturb to block calls and alerts. This stops interruptions while recording. Access it by swiping down from the top-right corner. Tap the crescent moon icon to enable. This mode keeps your video free from pop-ups and sounds. It helps maintain a smooth and professional flow.
Check Lighting And Sound
Good lighting improves video clarity, even for screen recordings. Record in a well-lit room to avoid shadows or glare. Ensure your microphone is clear if you add voiceover. Reduce background noise before starting. Testing sound levels prevents audio issues. Clear visuals and sound make your video more engaging.

Credit: www.nytimes.com
Frequently Asked Questions
How Do I Record My Screen On My Iphone?
Go to Settings > Control Center and add Screen Recording. Swipe down from the top-right and tap the record button. To record audio, press and hold the record button, then enable the microphone. Tap the red bar or record button again to stop.
Find recordings in the Photos app.
How Do You Record Your Screen?
Open Control Center by swiping down from the top-right corner. Tap the Screen Record button to start recording. To record audio, press and hold the button, then enable the microphone. Stop recording by tapping the red status bar or the button in Control Center.
Find videos in the Photos app.
Why Can’t I Find The Screen Recording On My Iphone?
You can’t find Screen Recording because it’s not added to Control Center. Go to Settings > Control Center, then tap the green + next to Screen Recording to enable it.
How Do I Add Screen Recording To The Control Center?
Open Settings and tap Control Center. Find Screen Recording and tap the green plus (+) to add it.
Conclusion
Screen recording on iPhone is simple and useful. Adding it to Control Center takes seconds. You can record videos with or without sound. Just swipe, tap, and start capturing your screen. Stop recording anytime and find your video in Photos.
Practice a few times to get comfortable. This feature helps save tutorials, games, and important moments easily. Keep your iPhone updated for the best experience. Now, enjoy recording what matters on your device!