Have you ever wanted to draw a cat but didn’t know where to start? You’re in the right place.
Drawing a cat can seem tricky, but with the right steps, you’ll be surprised at how easy and fun it can be. Whether you want to create a cute cartoon cat or a more realistic one, this guide is designed just for you.
By following simple, clear instructions, you’ll be able to bring your feline friend to life on paper. Ready to impress yourself and others with your drawing skills? Let’s dive in and discover how to draw a cat that you’ll be proud of!
Materials Needed
Gathering the right materials sets the stage for drawing a cat. Having tools ready helps the process flow smoothly. It also makes your drawing more enjoyable and less stressful. Let’s explore what you need to start your cat drawing journey.
Choosing Your Drawing Tools
Select pencils with different hardness levels. Use softer pencils like 2B for shading and harder ones like HB for outlines. Get a sharpener to keep your pencils precise. An eraser is essential for fixing mistakes and refining details. Consider using a blending stump to smooth shading. Paper quality matters; choose smooth drawing paper for cleaner lines. Colored pencils or markers add life if you want to color your cat.
Setting Up Your Workspace
Find a quiet, well-lit area to draw. Natural light works best but a bright lamp is fine. Clear your table of clutter to focus better. Keep all your tools within arm’s reach to avoid distractions. Use a comfortable chair to maintain good posture. A sketchbook or loose sheets work well for your drawings. Organize your materials before starting to keep the flow steady.
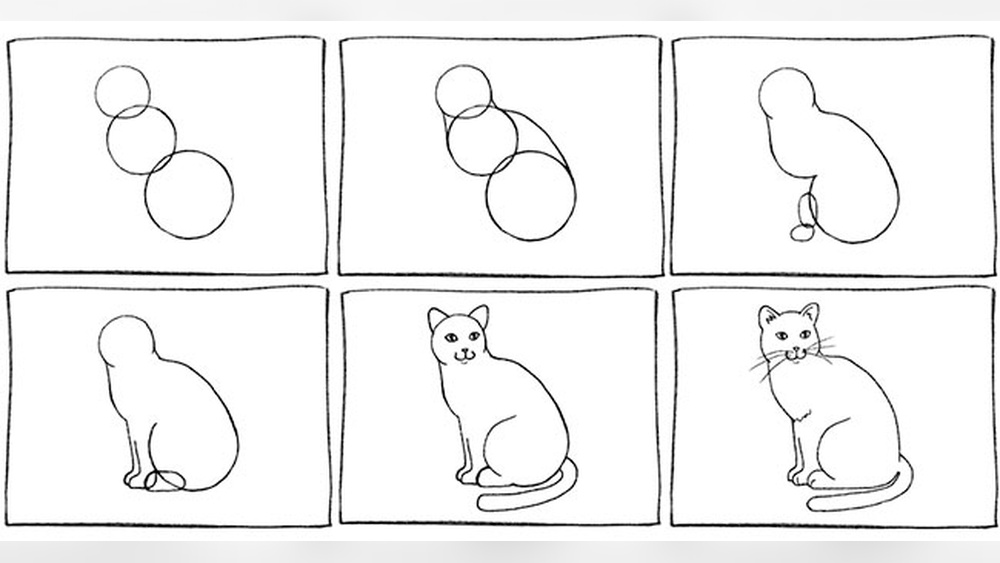
Basic Cat Shapes
Drawing a cat starts with simple shapes. These shapes form the base of your sketch. They help you get the right size and posture quickly. Start with circles and ovals to map out the cat’s body parts.
Use light lines for these shapes. This makes it easy to erase and adjust later. Focus on balance and proportion. Keep the shapes simple to avoid confusion.
Sketching The Head And Body
Begin with a circle for the head. It should be slightly wider at the top. For the body, draw a large oval below the head. Tilt the oval to match the cat’s pose. Connect the head and body with a smooth line for the neck.
Place the head slightly to one side if the cat looks sideways. This adds life to your drawing. Keep the shapes loose and round. Avoid sharp edges at this stage.
Adding Limbs And Tail
Use thin ovals for the legs. Draw two front legs close together. Make the back legs larger and bent if the cat sits. For paws, add small circles at the end of each limb. They mark where details go later.
Draw a long, curved shape for the tail. The tail’s position shows the cat’s mood. Point it upward for alertness or let it rest for calmness. Keep the tail’s shape smooth and flowing.
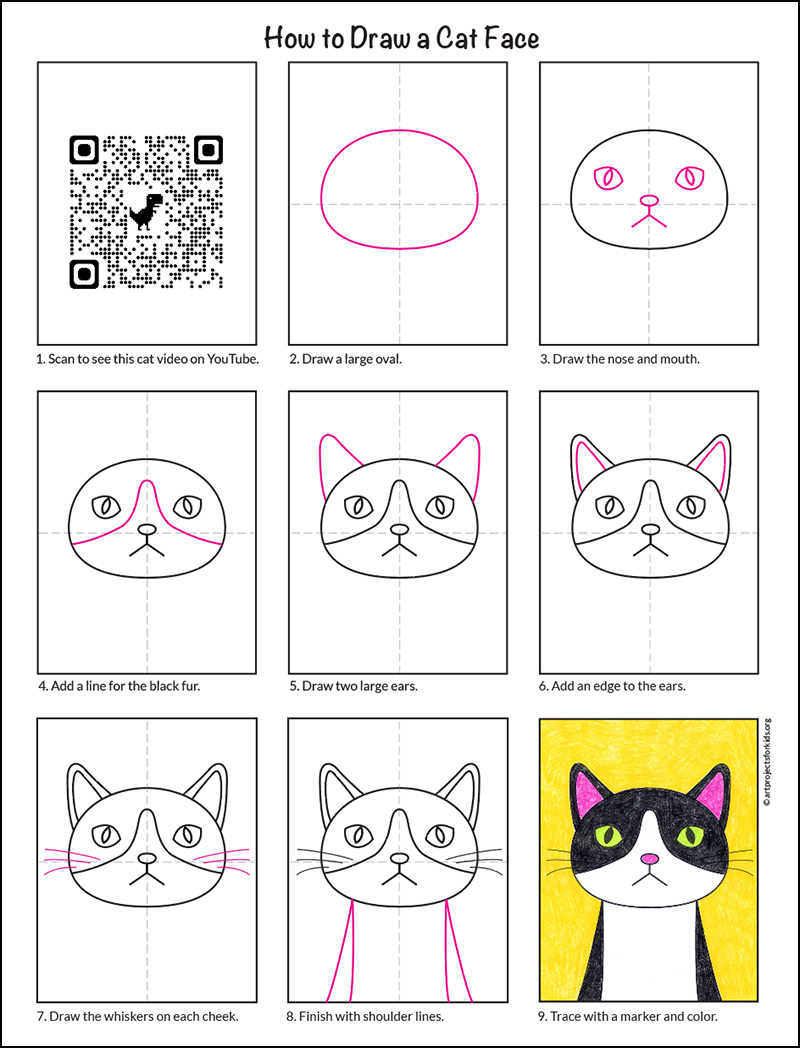
Drawing The Cat’s Face
Drawing a cat’s face brings your sketch to life. The face shows the cat’s personality and charm. Focus on simple shapes and clear lines. This makes the drawing easy and fun. Start with the main features: eyes, nose, mouth, whiskers, and ears. Each part adds character and detail.
Shaping The Eyes And Nose
Begin with the eyes. Draw two large almond shapes side by side. Leave some space between them for the nose. Inside each eye, add a circle for the pupil. Shade it slightly but leave a small white spot. This makes the eyes look shiny and alive.
Next, draw the nose below the eyes. Use a small triangle or an upside-down heart shape. Keep it simple. Add tiny nostrils at the bottom corners. The nose should be centered and balanced with the eyes.
Creating The Mouth And Whiskers
Draw a short line straight down from the nose’s tip. This line marks the center of the mouth. Then add two small curves starting from the line’s end. These curves form the cat’s mouth. Make the mouth soft and slightly open for a friendly look.
Whiskers are very important. Draw three to four long, thin lines on each side of the face. They should start near the mouth and fan out gently. Whiskers add realism and show the cat’s sensitive nature.
Adding Ears And Facial Details
Place two triangle shapes at the top corners of the head for ears. Make the triangles slightly curved to look natural. Inside each ear, draw a smaller triangle to show depth. Add a few short lines to suggest fur texture around the ears and face.
Finally, add light shading or stripes if you want. These details give your cat more life and personality. Use soft pencil strokes or light lines to keep the face gentle and cute.
Refining The Sketch
Refining the sketch is a key step in drawing a cat. It brings your initial outlines to life. This stage transforms rough shapes into clear, detailed art. Pay attention to small details. It will make your cat look more real and lively.
Focus on adding texture and depth. These elements give your drawing a natural feel. Take your time to work carefully. Use light strokes to avoid making mistakes that are hard to erase.
Defining The Fur Texture
Start by observing the cat’s fur direction. Use short, quick strokes to mimic hair. Change the pressure on your pencil for different fur lengths. Around the face, use finer strokes for soft fur. On the body, longer strokes show thicker fur.
Layer your strokes to build volume. Darker areas need more dense strokes. Light areas get fewer and lighter strokes. This contrast creates a realistic fur look. Avoid drawing every hair; suggest texture instead.
Enhancing With Shading And Lines
Shading adds form and depth to your cat drawing. Identify where the light hits the cat. Shade the opposite side with gentle, smooth strokes. Use a blending tool or your finger to soften shadows.
Define key features with clear lines. Draw the eyes, nose, and mouth with slightly darker lines. Add whiskers with quick, confident strokes. Keep shading subtle around these features to keep balance.
Use cross-hatching or layering to enrich shadows. This technique increases contrast and adds dimension. Check your drawing from a distance to see if shading looks natural. Adjust shading until the cat appears three-dimensional.
Adding Color And Patterns
Adding color and patterns brings your cat drawing to life. It gives personality and makes your artwork unique. Simple colors or detailed markings both work well. Choose colors that match the mood or style you want.
Choosing Cat Colors
Start with basic cat colors like black, white, gray, or orange. These colors are common and easy to blend. Use soft pencils or light paint to build layers. Layering creates a smooth and natural look. Pick colors that suit your cat’s character or story.
Drawing Stripes, Spots, And Markings
Stripes and spots add detail and interest. Use light strokes to draw stripes along the cat’s back and tail. Spots can be round or irregular shapes on the body. Notice how real cats have patterns that flow with their fur. Follow the cat’s shape and avoid harsh lines. Blend edges softly for a natural effect.

Credit: blog.udemy.com
Drawing Different Cat Poses
Drawing different cat poses adds life and character to your artwork. Each pose tells a story about the cat’s mood and behavior. Capturing these poses helps improve your skills and makes your drawings more interesting.
Start by observing how cats move and rest. Notice the shapes their bodies form in each position. Practice simple lines and shapes first to get the basic posture right.
Sitting Cat
A sitting cat shows calmness and alertness. Draw an oval for the body and a circle for the head. Add legs folded under the body and a curved tail beside it. Keep the lines smooth and rounded to show softness.
Focus on the ears pointing up and eyes looking forward. Add whiskers and small details last. This pose is great for beginners as it has clear and simple shapes.
Sleeping Cat
Sleeping cats look peaceful and relaxed. Draw the cat curled in a round shape. Use curved lines to show the body tucked in. Position the head resting on the paws or side.
Close the eyes with soft lines. Make the tail wrap gently around the body. Show the relaxed muscles with smooth outlines. This pose helps practice drawing curves and soft edges.
Stretching Cat
A stretching cat looks lively and flexible. Draw the body long and stretched out. Extend the front legs forward and the back legs backward. The back arches slightly in the middle.
Show the head lifted or looking down. The tail usually lifts or curves. Use long, flowing lines to capture the stretch. This pose teaches you to draw movement and balance.
Tips For Realistic Cat Sketches
Drawing a cat that looks real takes more than just copying its shape. It needs careful observation and practice. These tips help you sketch cats with lifelike details and energy. Focus on the structure and natural poses of cats to bring your drawing to life.
Understanding how cats move and express themselves will add depth to your art. Simple steps can improve your skills and make your cat sketches more believable.
Observing Cat Anatomy
Start by studying the cat’s body structure. Notice the shape of the head, the length of the legs, and the curve of the back. Cats have flexible spines and slender limbs. Pay attention to muscle placement and how the paws are formed. These details give your sketch a solid base. Use light lines first to map out the basic shapes. This helps keep proportions correct. Look at photos or real cats to see these features clearly.
Capturing Expressions And Movements
Cats show many emotions through their eyes and posture. Watch how their ears tilt or how their tail moves. These small changes tell a story. Try to capture the cat’s mood by focusing on facial expressions. A curious cat has wide eyes, while a relaxed one might have half-closed eyelids. Movement is key for realism. Draw cats in natural poses like stretching, jumping, or sitting. Quick sketches of these moments improve your ability to show life and energy in your drawings.
Credit: artprojectsforkids.org
Common Mistakes To Avoid
Drawing a cat is fun but tricky. Many beginners make the same errors. Avoiding these mistakes helps create better cat drawings. Focus on simple shapes and correct proportions. This section highlights common mistakes to avoid for smoother drawing.
Incorrect Proportions
Many drawings show cat heads too big or too small. Balance the head size with the body. Use basic shapes to measure proportions before details.
Ignoring Cat’s Unique Features
Cats have sharp ears, almond eyes, and a small nose. Missing these details makes your cat look wrong. Study cat pictures to capture these features well.
Overcomplicating The Fur Texture
Trying to draw every hair can ruin your art. Use simple strokes for fur texture. Focus on the fur flow and direction, not every strand.
Wrong Eye Placement
Placing eyes too high or too close changes the cat’s expression. Place eyes about halfway down the head. Keep space between eyes equal to one eye width.
Neglecting The Cat’s Pose
Stiff or unnatural poses reduce the charm of your cat. Observe how cats sit or walk. Use light sketch lines to plan poses before drawing.
Practice Exercises
Practice exercises build your drawing skills step by step. They help you observe shapes, lines, and details better. Regular practice trains your hand and eye to work together smoothly. Try different exercises to improve various parts of your cat drawing.
Quick Gesture Sketches
Quick gesture sketches capture the cat’s basic movement fast. Use light, loose lines to show the shape and pose. Spend 1 to 2 minutes per sketch. This exercise helps you understand the cat’s body flow and energy. Draw many sketches to get comfortable with cat shapes.
Detailed Face Studies
Detailed face studies focus on the cat’s facial features closely. Draw the eyes, nose, mouth, and ears carefully. Look at photos or real cats for reference. Work slowly to capture shapes and shadows. This exercise improves your skill in drawing fine details and expressions.

Credit: www.hellowonderful.co
Frequently Asked Questions
How To Draw An Easy Simple Cat?
Start with a circle for the head and an oval for the body. Add triangle ears, round eyes, and a small nose. Draw simple whiskers and a curved tail. Use smooth lines and keep shapes basic for an easy, cute cat drawing.
How To Draw A Cat Face Step By Step?
Start by sketching a round face shape. Add two pointed ears on top. Draw large almond eyes, a small nose, and a curved mouth. Include whiskers and inner ear details. Outline stripes or spots for texture. Darken lines and color to complete the cat face drawing.
What’s The Easiest Realistic Animal To Draw?
The easiest realistic animal to draw is a cat. Its simple shapes and clear features help beginners create lifelike sketches quickly.
How To Draw A Basic Cat Sitting?
Start by sketching a rounded head and pointed ears. Draw a curved back and rounded rump. Add front legs tucked under the chest. Sketch the tail curled around the body. Finish with facial features and whiskers for a basic sitting cat.
Conclusion
Drawing a cat can be simple and fun with practice. Follow each step slowly and enjoy the process. Use basic shapes to build your cat’s body and face. Add details like whiskers and stripes to bring it to life. Keep practicing to improve your skills every day.
Soon, you will create cats that look unique and full of character. Drawing helps you relax and express your creativity. So grab your pencil and start your next cat drawing today!