Have you ever wondered where some important files on your Windows 10 or 11 computer disappear to? Sometimes, files hide themselves from plain sight, making it tricky for you to find or manage them.
Whether you’re troubleshooting, organizing your system, or just curious, knowing how to reveal these hidden files can save you time and frustration. In this guide, you’ll discover simple, step-by-step ways to uncover those hidden files on your PC—no tech expertise needed.
Keep reading to unlock the secrets your computer has been keeping from you!
Quick Steps To Reveal Hidden Files
Hidden files store important system data or personal information. Sometimes, you need to see these files for troubleshooting or managing your computer. Windows 10 and 11 let you reveal hidden files easily with simple steps. Follow this quick guide to show hidden files fast.
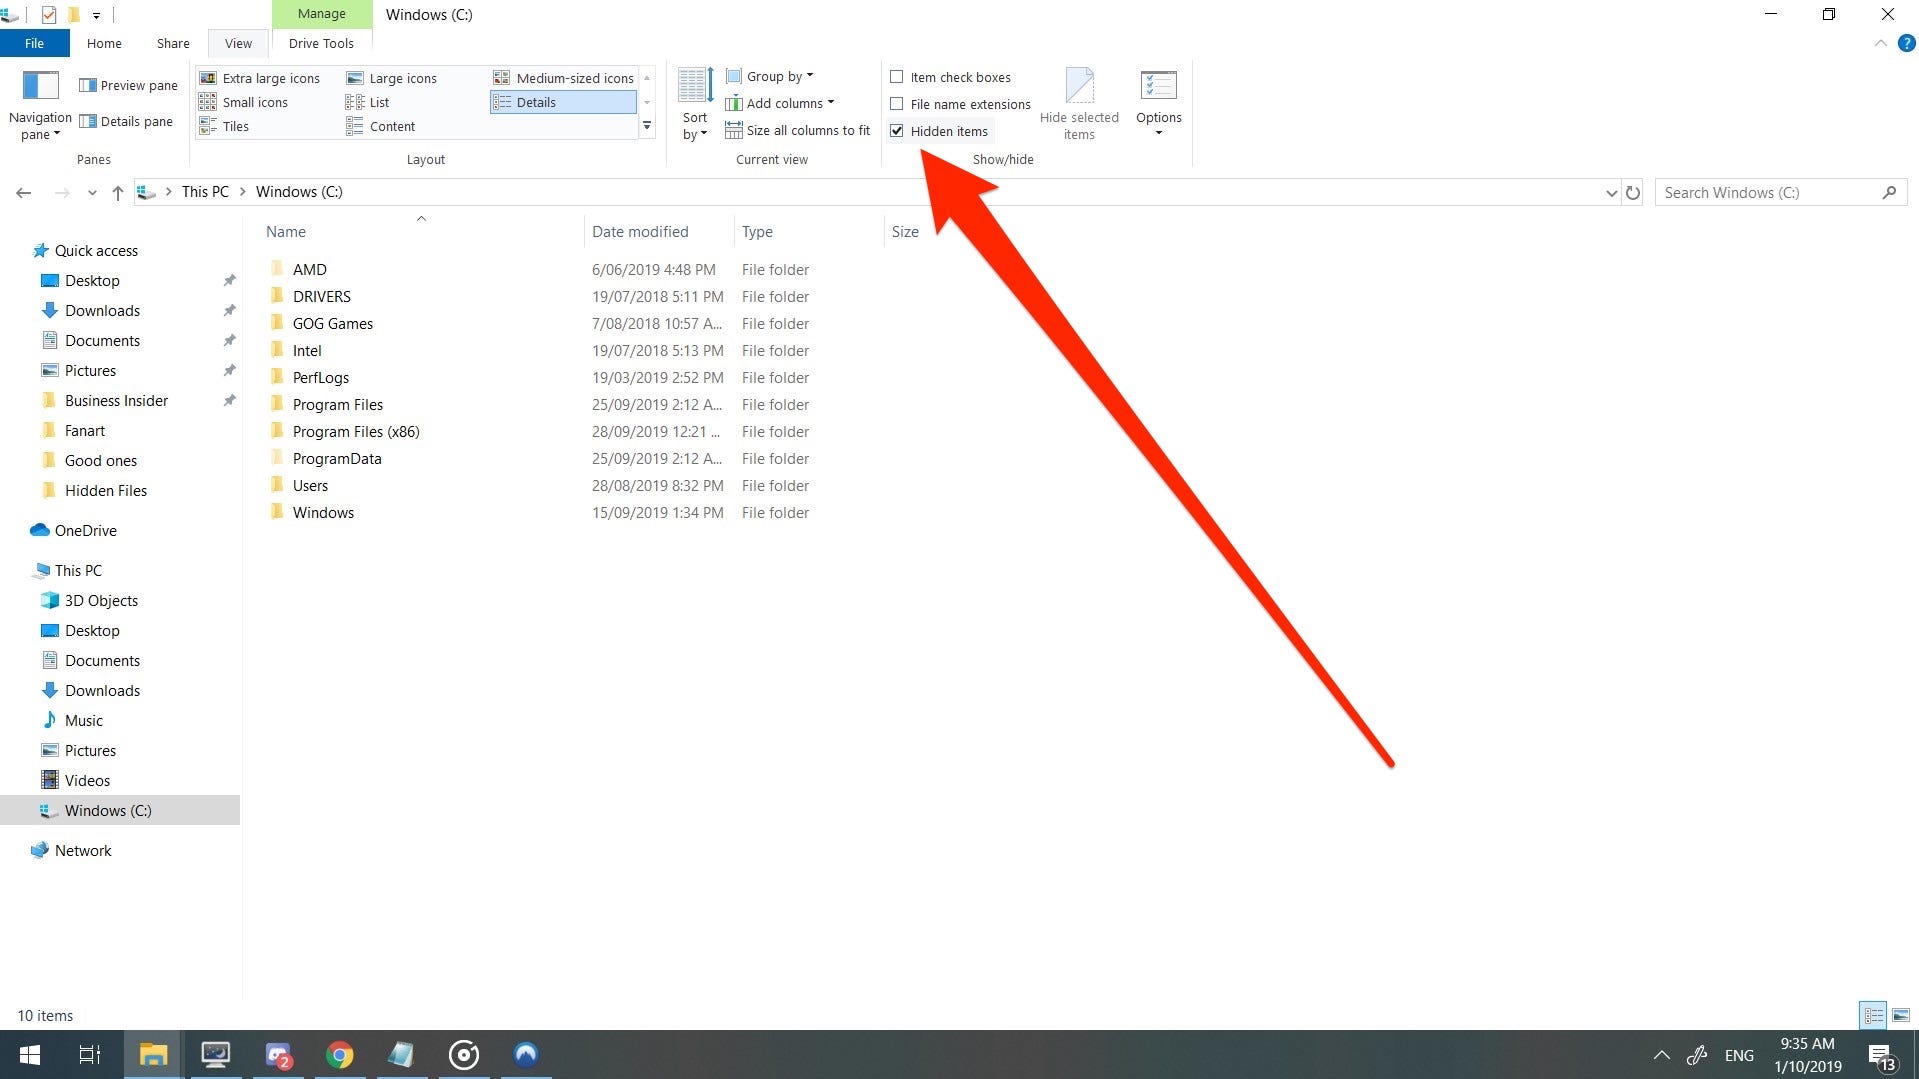
Open File Explorer
First, open File Explorer. Click the folder icon on the taskbar or press Win + E on your keyboard. This opens the main window where you can browse your files and folders.
Access The View Tab
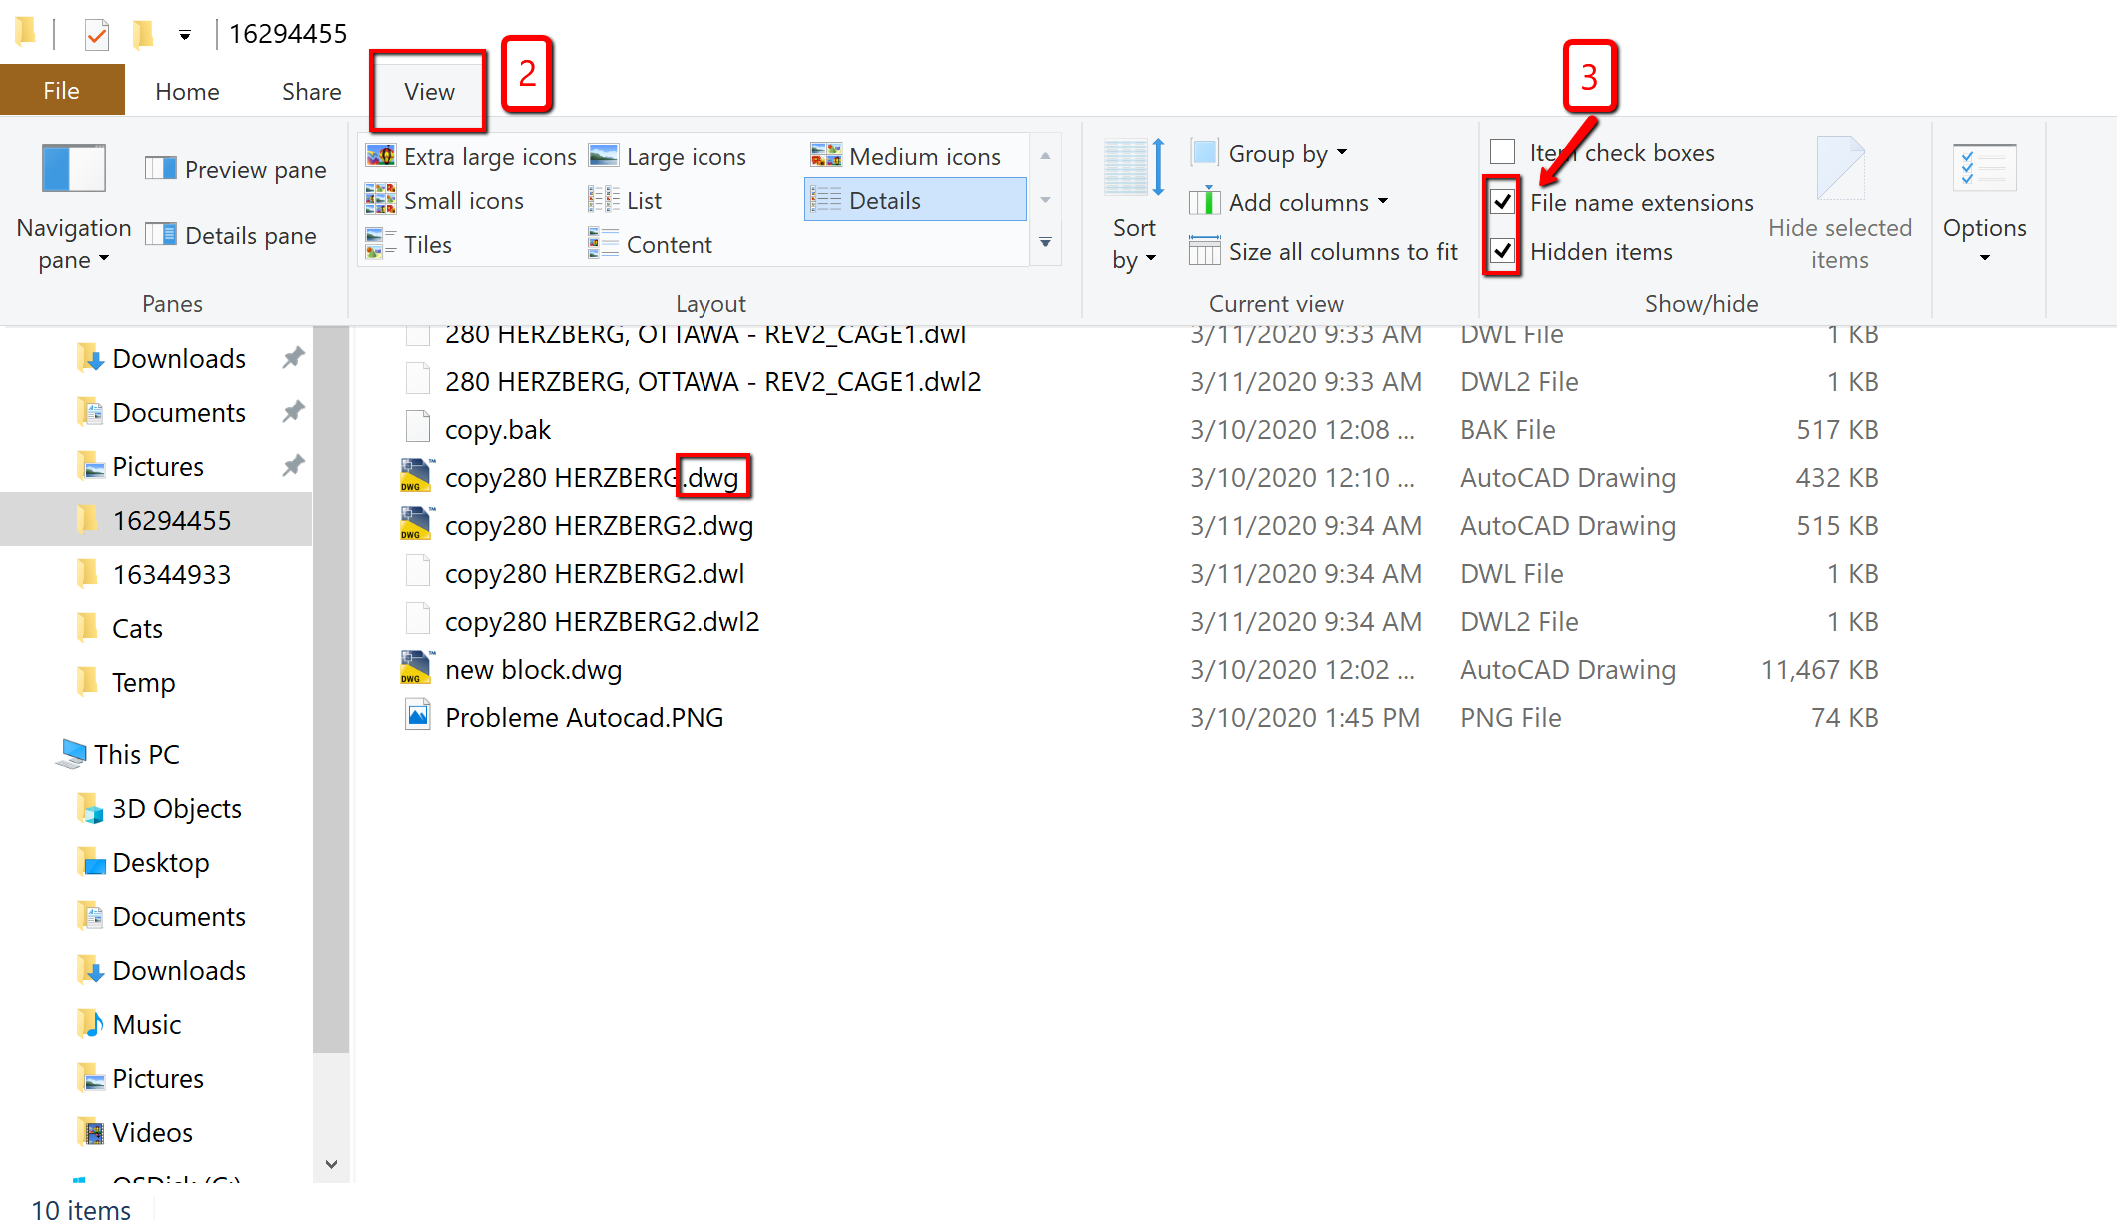
Look at the top of the File Explorer window. Find and click the View tab. This tab controls how files and folders appear on your screen. It gives options to change the display settings.
Enable Hidden Items
Inside the View tab, find the section labeled Show. Click on it and then select Hidden items. This action makes all hidden files and folders visible. They usually appear slightly faded to show they were hidden before.
Credit: www.autodesk.com
Viewing System Files
Viewing system files on Windows 10 and 11 helps you access important hidden data. These files are usually protected to prevent accidental changes. You can reveal them by changing folder settings. This allows you to troubleshoot or manage your computer better.
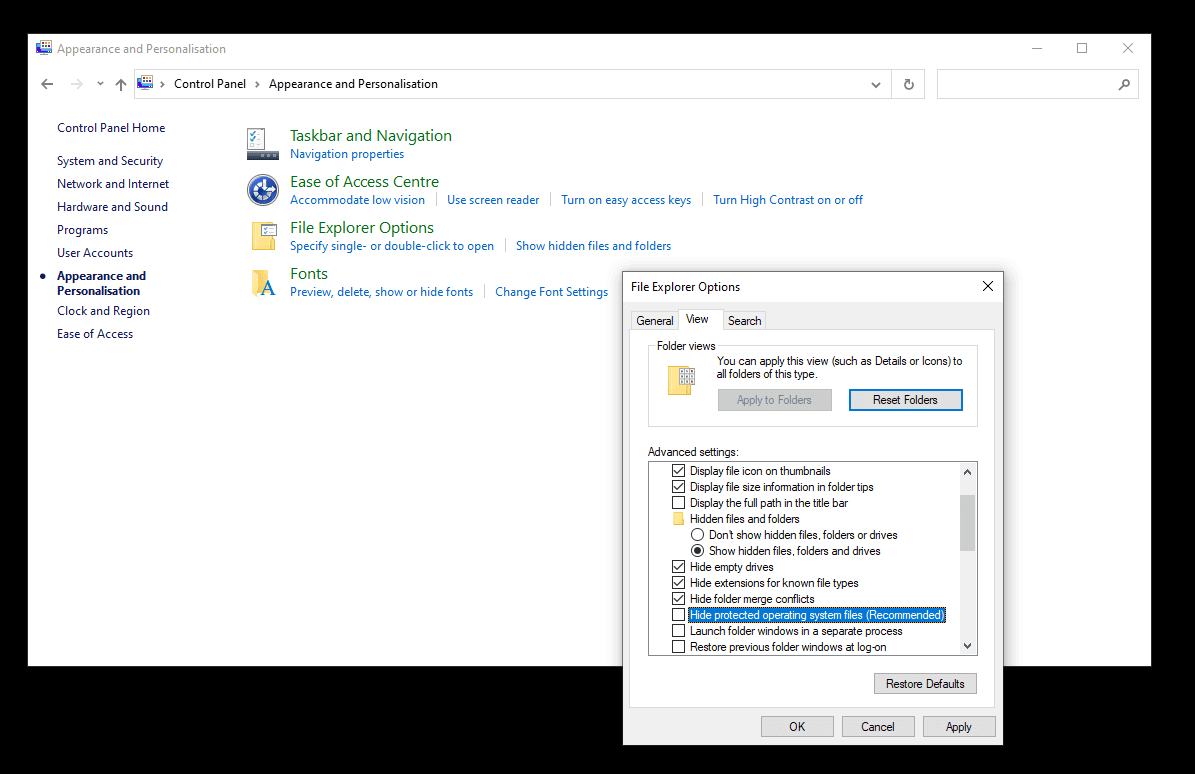
Open Folder Options
Press Win + R to open the Run dialog. Type Control folders and hit Enter. This opens the Folder Options window. You can also find it via Control Panel under Appearance and Personalization.
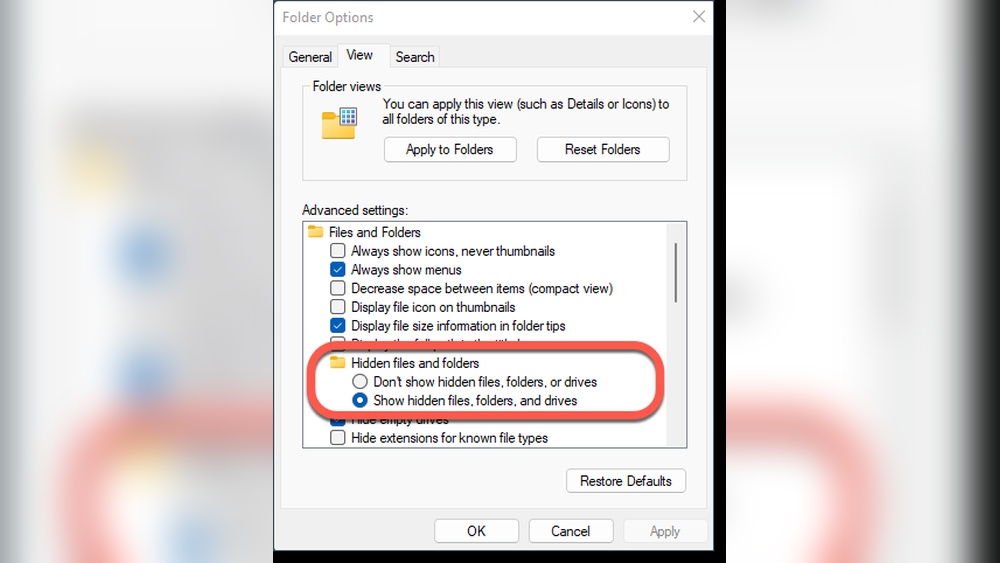
Adjust Advanced Settings
Inside Folder Options, click the View tab. Find the section called Advanced Settings. Select Show hidden files, folders, and drives to make hidden items visible. This reveals most hidden files on your system.
Show Protected Operating System Files
In the same View tab, look for Hide protected operating system files (Recommended). Uncheck this box to see system files. A warning will appear; confirm to proceed. These files are critical, so be careful when handling them.
Using Run Command For Folder Options
Using the Run command to access Folder Options is a quick way to find hidden files on Windows 10 and 11. This method bypasses navigating through many menus. It opens the settings directly where you can adjust file visibility. Follow the steps below to reveal hidden files easily.
Launch Control Panel Folder Settings
Press Win + R on your keyboard to open the Run dialog box. Type Control folders and hit Enter. This action opens the Folder Options window in the Control Panel. Here, you will manage how files and folders are shown on your system.
Navigate To View Settings
Inside the Folder Options window, click the View tab. This tab holds settings related to folder display. Scroll through the list to find options about hidden files. Look for Hidden files and folders and select Show hidden files, folders, and drives.
Apply Changes
After selecting the option to show hidden files, click Apply at the bottom of the window. Then click OK to close the Folder Options. Now, hidden files and folders will appear in File Explorer. They usually look slightly transparent compared to normal files.
Credit: softwareg.com.au
Making Hidden Files Permanently Visible
Making hidden files permanently visible on Windows 10 and 11 helps you access important files anytime. It avoids repeating the process each time you open File Explorer. This guide shows simple steps to keep hidden files visible all the time.
Modify Folder Options
Open File Explorer by clicking the folder icon on your taskbar. Select the “View” tab at the top of the window. Click on “Options” located on the right side to open Folder Options. In the Folder Options window, switch to the “View” tab.
Under Advanced settings, find the option called “Hidden files and folders.” Select “Show hidden files, folders, and drives” to make hidden items visible. To see system files, uncheck “Hide protected operating system files.” Confirm the warning message if it appears. This step ensures you can see all hidden files without hiding them again.
Save And Confirm Settings
After modifying the settings, click the “Apply” button at the bottom of the Folder Options window. Then click “OK” to save your changes. Close and reopen File Explorer to check if hidden files are visible. Your settings now keep hidden files permanently visible across all folders.
This method saves time and helps manage files easily without missing anything important. Hidden files will appear slightly faded, making them easy to identify.
Searching For Hidden Files
Searching for hidden files on Windows 10 and 11 can help you find important data. Some files stay hidden to protect system integrity or avoid clutter. Knowing how to search for these files is useful for troubleshooting or file recovery.
Windows offers built-in tools to help reveal hidden files quickly. Using the search function in File Explorer is one of the easiest ways to locate these files. Adjusting search filters lets you refine results further and find exactly what you need.
Using File Explorer Search Bar
Open File Explorer by clicking the folder icon on the taskbar or pressing Win + E. Navigate to the folder or drive where you want to search. Click the search bar at the top right corner of the window. Type your search term to find files matching the name or content.
To include hidden files in your search, first enable hidden items in File Explorer. Go to the View tab and check the “Hidden items” box. This makes hidden files visible and searchable. Now, when you use the search bar, Windows will look inside hidden folders and files too.
Filter Search Results
After typing your search term, use search filters to narrow down results. Click the Search tab that appears after you start typing. Filters like date modified, file size, and file type help you find specific files faster.
To find only hidden files, add the filter “attributes:hidden” in the search bar. For example, type .docx attributes:hidden to find hidden Word documents. This filter shows only files marked as hidden, saving time.
Combining search terms and filters gives precise control over the search. It helps uncover files that are hard to find with a simple search. Using these methods makes managing hidden files easier on Windows 10 and 11.
Recovering Deleted Hidden Files
Deleted hidden files can cause trouble if lost without backup. Recovering these files restores important data. The process needs the right tools and steps.
Data recovery software helps find and recover deleted hidden files. The software scans drives deeply. Then, you select files to restore.
Choose Recovery Software
Select reliable recovery software that supports Windows 10 and 11. Look for user-friendly programs with good reviews. Free versions are available but may limit recovery options.
Scan For Lost Data
Install the software and run a full scan on the drive. This scan searches for deleted hidden files and other lost data. The process may take some time depending on drive size.
Restore Selected Files
After scanning, the software shows recoverable files. Preview files to confirm they are correct. Choose the files and restore them to a safe location. Avoid saving files to the same drive to prevent overwriting.
Tips For Managing Hidden Files
Managing hidden files on Windows 10 and 11 requires care and attention. These files are often important for system functions or app settings. Handling them properly keeps your system safe and running smoothly. Here are some tips to help you manage hidden files effectively.
Identifying Hidden Folder Icons
Hidden folders appear slightly faded in File Explorer. This faded look helps you spot files that are not normally visible. Pay attention to this visual cue to avoid confusion with regular files. It ensures you know which files are hidden at a glance.
Rehiding Files After Access
After viewing or editing hidden files, rehide them to protect your system. Use the same steps to toggle the visibility off. This keeps important files safe from accidental changes or deletions. Always double-check that files are hidden again before closing File Explorer.
Avoiding Unintentional Changes
Hidden files often control system settings and apps. Changing these files by mistake can cause errors. Do not edit or delete hidden files unless you understand their purpose. Create backups before making any changes to hidden files. This way, you can restore your system if needed.
Credit: www.manageengine.com
Frequently Asked Questions
How Do I See Hidden Files In Windows 11?
Open File Explorer, click the View tab, select Show, then check Hidden items to display hidden files in Windows 11.
How Do I Unhide All Files And Folders?
Open File Explorer, click the View tab, select Show, then check Hidden items. For system files, adjust Folder Options under the View tab to show hidden and protected files. Click Apply and OK to unhide all files and folders.
How To Make Hidden Files Permanently Visible?
Open File Explorer, click View > Show, then check Hidden items. For permanent visibility, open Folder Options, go to View tab, select “Show hidden files, folders, and drives,” apply changes, and click OK. Hidden files remain visible until settings change.
How To Recover Your Hidden Files?
Open File Explorer, click the View tab, then check “Hidden items” to reveal hidden files. Use recovery software like Disk Drill to restore deleted hidden files.
Conclusion
Finding hidden files on Windows 10 and 11 is simple and quick. Just follow the steps to reveal hidden or system files safely. You can explore folders with confidence and manage your files better. Remember to hide files again if you don’t want them visible.
This way, your system stays organized and secure. Keep practicing these methods, and you will get comfortable in no time. Hidden files won’t stay hidden for long!