Have you ever wanted to create a paper airplane that soars farther and flies smoother than any you’ve made before? Whether you’re looking to impress your friends, challenge yourself, or simply enjoy a fun and easy craft, learning how to make a paper airplane is a great place to start.
In this guide, you’ll discover simple steps to fold your own high-flying paper plane that’s both fast and stable. Ready to turn a single sheet of paper into an exciting flying machine? Let’s dive in and unlock the secrets to making your best paper airplane yet.
Materials Needed
Learning basic folding techniques is the first step to making a great paper airplane. These simple folds create the plane’s shape and help it fly smoothly. Practice each fold carefully to get neat and sharp edges.
Folding The Center Line
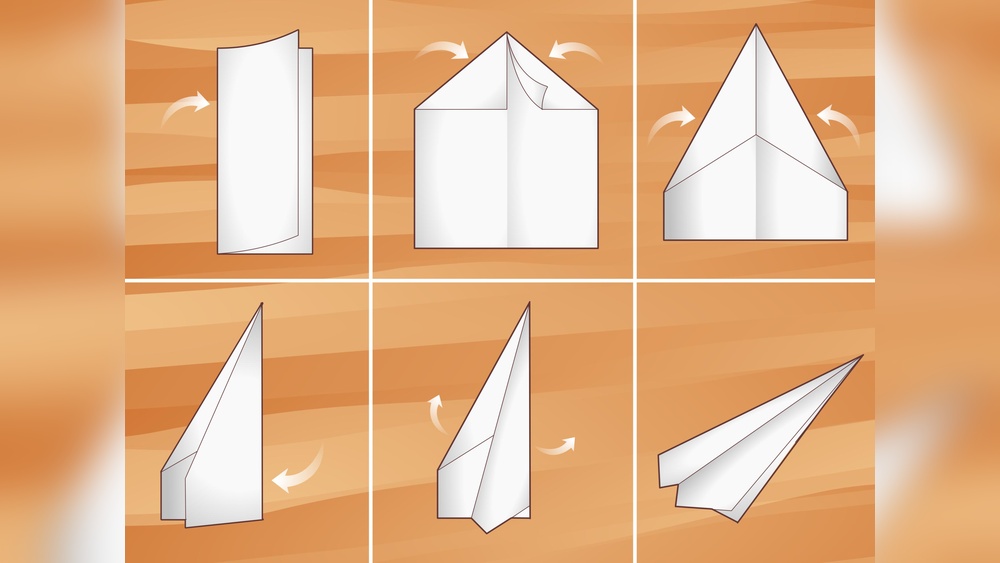
Start by folding the paper in half lengthwise. This fold is the center line and acts as a guide for other folds. Make sure the edges match perfectly. Press firmly along the crease to make it sharp. Then, unfold the paper to see the center line clearly.
Creating Wing Folds
Fold the top corners down to the center line. This creates the wings of the airplane. Both sides should be even and aligned with the center line. Press the folds firmly to keep the wings stiff. These wing folds help the plane glide in the air.
Shaping The Nose
Fold the pointed tip down toward the bottom edge of the paper. This shapes the nose of the airplane. A sharp nose reduces air resistance and helps the plane fly farther. Make sure the fold is tight and straight. A well-shaped nose improves flight stability.

Credit: www.wikihow.com
Basic Folding Techniques
Folding a paper airplane is fun and easy. This guide breaks down each step clearly. Follow along to create a sleek paper airplane that flies well. Simple folds lead to great flights. Let’s start with the basics and move through each part carefully.
Preparing The Paper
Use a clean sheet of paper. A standard 8.5×11 inch works best. Place it flat on a table. Make sure the paper is smooth with no wrinkles. Align the edges so the paper is straight. This helps your airplane fly better.
Folding The Wings
Fold the paper in half lengthwise. Press the fold firmly to create a sharp crease. Unfold the paper to reveal a center line. Fold the top corners down to the center line. These form the airplane’s nose. Fold the triangle down over the corners. Now fold each side down to make the wings. Make sure the wings are even on both sides.
Final Adjustments
Check all folds are sharp and neat. Fold small wing tips upward for stability. Adjust the wings to be flat and level. Test your airplane by throwing it gently. Make small changes to improve flight distance and balance. Enjoy flying your paper airplane!
Step-by-step Folding Guide
Making a paper airplane is fun but can be tricky. Small errors can stop your plane from flying well. Knowing common mistakes helps you avoid them. This way, your plane flies farther and steadier. Focus on these common problems to improve your paper airplane skills.
Uneven Folds
Uneven folds make your plane unstable. The wings may not match on both sides. This causes the plane to tilt or spin. Take time to fold carefully and align edges. Sharp, even folds help the plane fly straight. Use your fingernail or a flat tool to press down folds firmly.
Heavy Nose
A nose that is too heavy makes the plane dive quickly. Add too many layers at the front, and your plane loses balance. Keep the nose light but firm. Avoid folding too much paper at the tip. A balanced nose helps the plane glide smoothly through the air.
Ignoring Wing Shape
Wing shape affects lift and flight distance. Flat wings may not catch enough air. Wings bent too much can cause the plane to stall. Slightly angled wings create better lift and control. Check your wing shape before throwing. Adjust the wings until your plane glides well and stays stable.
Tips For Perfect Flights
Making a paper airplane is fun on its own. Trying new styles makes it even better. Different variations can change how your plane flies and looks. These changes keep the activity fresh and exciting. Here are some ideas to make your paper airplane stand out.
Launcher Attachments
Adding a launcher can help your plane fly farther. Use a rubber band or a small catapult made from paper. Attach the launcher to the back or bottom of the plane. This gives extra speed when you release it. Experiment with different attachments to find what works best.
Decorative Designs
Decorating your plane makes it unique and fun to show off. Use markers, stickers, or colored paper to add patterns. Draw stripes, dots, or cool shapes on the wings. You can even write your name or a message. Decorations do not affect flight but add personality.
Origami Techniques
Origami folding adds creativity and strength to your paper airplane. Try folding different wing shapes or adding flaps for better control. Use precise, clean folds for smooth flight. Some origami styles make the plane glide longer or do tricks. Learning new folds keeps the craft interesting.
Advanced Designs
Troubleshooting flight issues helps improve your paper airplane’s performance. Small changes fix common problems. Understanding flight behavior makes flying more fun. Try these tips to get the best flight results.
Correcting Dives And Spins
Dives happen when the nose points sharply down. Bend the tail edges slightly up to lift the nose. Spins occur if one wing dips. Adjust the wings evenly to balance the plane. Make small tweaks and test flight after each change.
Improving Glide Distance
Long glides need smooth, steady flight. Straighten the wings and keep them level. Add small wing flaps at the back to slow descent. Use lightweight paper for less drag. Throw gently with a smooth motion for better distance.
Adjusting For Wind
Wind affects flight path and stability. Fly indoors or on calm days for best results. If outside, angle the plane slightly into the wind. Make wings stiffer to resist gusts. Adjust the flight angle to keep control against wind.

Credit: www.doodlecraftblog.com

Credit: en.wikipedia.org
Frequently Asked Questions
How To Make A Paper Airplane Step By Step?
Fold paper in half lengthwise. Unfold, fold top corners to center crease. Fold top edges to center. Fold plane in half. Fold wings down to meet bottom edge. Adjust wings for balance. Throw gently to fly.
How To Make A Paper Plane That Flies A Lot?
Fold a symmetrical plane with sharp creases and a nose-heavy tip. Adjust wing edges slightly upward for lift. Throw smoothly with moderate force. Test and fine-tune wing bends to balance flight. Use lightweight paper for longer glides and fly in calm, open spaces.
What Is A Basic Paper Airplane?
A basic paper airplane is a simple toy made by folding one sheet of paper into a nose-heavy, dart-like glider.
What Is The Best Paper Airplane Design For Distance?
The best paper airplane design for distance is the “Suzanne” or sleek darts like “Arrowhead. ” Both glide far with sharp folds and proper tuning. Adjust wing edges to stabilize flight and ensure perfect symmetry for maximum range.
Conclusion
Making a paper airplane is simple and fun for all ages. Follow the steps carefully to create your own flyer. Experiment with different folds to see how far it can go. Each plane can be unique, so enjoy the process.
Keep practicing to improve your folding skills and flight distance. Paper airplanes offer a great way to learn and play at the same time. Grab a sheet of paper and start folding today!