If you love your Keurig for quick and delicious coffee, keeping it in top shape is a must. Over time, mineral buildup from water can clog your machine, affecting taste and performance.
Descaling your Keurig regularly is the secret to smooth brewing and great-tasting coffee every time. Wondering how to descale your Keurig easily at home? This guide will walk you through simple, step-by-step instructions that save you time and frustration. By following these tips, you’ll extend your Keurig’s life and enjoy the perfect cup with every brew.
Keep reading to learn how to get your Keurig sparkling clean and ready to serve your next coffee fix!

Credit: www.esseg.eu
Why Descale Your Keurig
Descaling your Keurig is a vital task to keep your coffee maker running smoothly. Over time, minerals from water build up inside the machine. This buildup affects performance and taste. Understanding why to descale helps you protect your Keurig and enjoy better coffee every day.
Impact Of Mineral Buildup
Mineral deposits clog the internal parts of your Keurig. This blockage slows water flow and reduces heating efficiency. The machine may take longer to brew or stop working properly. Mineral buildup also changes the flavor of your coffee, making it taste bitter or off. Ignoring this can shorten your Keurig’s lifespan and lead to costly repairs.
Benefits Of Regular Descaling
Regular descaling keeps your Keurig clean and efficient. It removes mineral deposits that block water pathways. This improves brewing speed and consistency. Your coffee will taste fresher and more enjoyable. Descaling also helps avoid unexpected breakdowns. Keeping the machine clean saves money and extends its life. It ensures your Keurig works well for every cup you make.

Credit: www.wikihow.com
When To Descale
Knowing when to descale your Keurig is key to keeping it working well. Descaling removes mineral buildup inside the machine. This buildup affects taste and performance. Regular descaling extends your Keurig’s life and ensures great coffee every time.
Recognizing Descale Light
Many Keurig models have a descale light. This light turns on when it is time to clean the machine. It usually appears as a small icon on the control panel. The light helps you avoid guesswork. It means minerals have built up inside. Follow the machine’s guide to start descaling once the light appears.
Signs Of Reduced Performance
Watch for changes in your coffee maker’s performance. Slow brewing or weak coffee can mean scaling. Water may not flow properly if minerals block the system. Strange noises or leaks also signal buildup. If your Keurig struggles to heat water, it may need descaling. These signs tell you to clean the machine even if the descale light is off.
Preparing To Descale
Preparing to descale your Keurig is a simple task. It sets the stage for effective cleaning. Taking a few careful steps makes the process smooth and safe. Follow these key actions before starting the descale cycle.
Emptying The Reservoir
Remove the water reservoir from the machine. Pour out any remaining water completely. A dry reservoir ensures the descaling solution works well. Wipe the inside with a clean cloth if needed. Then place the reservoir back in its spot.
Removing K-cups
Open the K-Cup holder and take out any pods. Leaving K-Cups inside may block the descale flow. Check the holder carefully to avoid missing any. This clears the path for the descaling liquid to pass through.
Gathering Supplies
Get your descaling solution ready. Use a Keurig-approved descaler or white vinegar. Have a large mug or container to catch the liquid. Keep a clean cloth nearby for any spills. Prepare fresh water for rinsing after the process.
Activating Descale Mode
Activating descale mode is a key step in cleaning your Keurig machine. It prepares the brewer to remove mineral build-up effectively. This process helps keep your coffee tasting fresh and your machine working well. Follow the simple steps below to activate descale mode properly.
Turning Off The Brewer
First, turn off your Keurig by pressing the power button. Ensure no K-cup is in the pod holder. Place a large mug under the machine to catch any liquid during the process. Turning off the brewer sets it up to enter descale mode.
Starting Descale Mode
Press and hold the brew button for about 5 seconds. The descale light will start flashing. The brew button will also begin blinking. This signals that descale mode is active. Press the brew button once to start the first cleaning cycle. Pour out the hot liquid into the sink after each cycle finishes. Keep running cycles, adding more descaling solution if needed. Stop when the “Add Water” light turns on.
What The Lights Mean
The flashing descale light means the machine is in descale mode. A blinking brew button shows the cleaning cycle is ready to start. The “Add Water” light signals it is time to refill the water reservoir. Once you run fresh water cycles and the descale light turns off, the process is complete.
Running Descale Cycles
Running descale cycles is essential to keep your Keurig brewing smoothly. This process removes mineral buildup inside the machine. Following the right steps ensures your coffee tastes fresh and your machine lasts longer. Start by preparing the descaling solution and get ready to run multiple brew cycles.
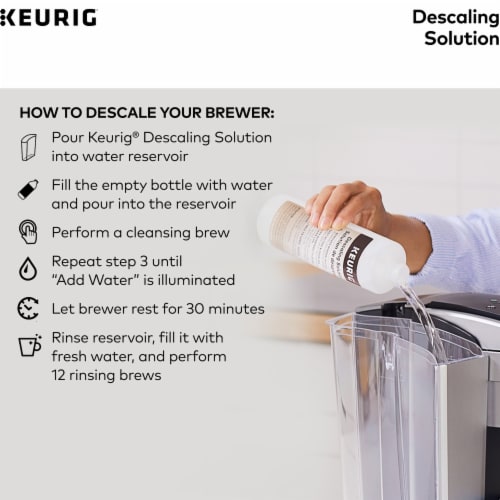
Using Descaling Solution
Pour the descaling solution into the water reservoir. Fill it up with the recommended amount of water. Make sure no K-cup is in the holder. Place a large mug under the spout to catch the liquid. Turn on the Keurig and start the brewing process without a coffee pod. The machine will run the descaling liquid through its system.
Discarding Brewed Liquid
After each cycle, discard the brewed liquid. It may contain dirt and scale from inside the machine. Pour it down the sink to avoid any mess. Keep the mug ready to catch the next cycle’s liquid. This step prevents old residues from affecting your next brew.
Refilling As Needed
Keep an eye on the water reservoir during the cycles. Refill it with the descaling solution and water mixture as it empties. Continue running cycles until the machine signals to add fresh water. This usually happens when the “Add Water” light turns on. Then, refill the reservoir with clean water only for rinsing.
Flushing With Fresh Water
Flushing with fresh water is a vital step after descaling your Keurig. It removes any leftover descaling solution. This step ensures your coffee tastes pure and fresh. Proper flushing protects the machine from damage. It also helps keep your Keurig running smoothly for a long time.
Emptying And Refilling Reservoir
First, empty the water reservoir completely. Pour out any descaling solution left inside. Rinse the reservoir with clean water. Then, fill it with fresh, cold water up to the maximum fill line. This fresh water will flush out the descaling chemicals from the machine’s system.
Running Water-only Cycles
Place a large mug on the drip tray. Start a brew cycle without inserting a K-cup. Let the machine run only water through its system. Discard the water collected in the mug. Repeat this process at least three times. This clears out any remaining descaling solution for a safe brew.
Turning Off Descale Light
After flushing, check the descale light on your Keurig. It should turn off automatically after enough water-only cycles. If not, consult your model’s manual for reset instructions. Turning off the descale light confirms the machine is ready for use. Now, enjoy clean and fresh coffee every time.
Cleaning After Descaling
After completing the descaling process, the Keurig needs a thorough cleaning. This step removes any leftover descaling solution. It keeps your coffee tasting fresh. Clean parts also help the machine last longer. Follow these simple steps to clean your Keurig after descaling.
Rinsing The Reservoir
Remove the water reservoir from the machine carefully. Empty any remaining descaling solution inside. Rinse the reservoir well with fresh water. Fill it up with clean water. Run a few brew cycles without a K-cup. This flushes out the last traces of the solution. Repeat rinsing if you notice any taste of vinegar or cleaner.
Cleaning Pod Holder And Brew Head
Take out the pod holder from the machine. Wash it with warm, soapy water to remove residue. Use a soft brush or cloth to clean hard-to-reach areas. Wipe the brew head with a damp cloth. Check the needle for clogs and clear gently if needed. Reassemble the pod holder and brew head once dry. This keeps your machine working smoothly and your coffee pure.
Tips For Maintenance
Keeping your Keurig in top shape needs simple maintenance habits. These habits stop buildup and keep your coffee tasting fresh. Small steps help your machine last longer and work better.
Focus on water quality and a cleaning schedule. These two tips can save you time and money over time.
Using Filtered Water
Filtered water reduces minerals that cause scale buildup. It keeps your machine cleaner inside. Using tap water often leads to faster deposits and clogs. Filtered water protects the heating elements and pipes. Your coffee will taste better too, without odd flavors from minerals.
Scheduling Regular Descaling
Set a routine to descale your Keurig every 3 to 6 months. Frequent descaling stops thick scale layers from forming. It keeps water flow steady and brewing smooth. Mark your calendar or set phone reminders. Regular cleaning helps avoid costly repairs and keeps your machine running well.
Alternative Descaling Methods
Alternative descaling methods offer effective ways to clean your Keurig without relying solely on the machine’s built-in process. These options can be budget-friendly and use common household items or specially made solutions. Proper descaling removes mineral buildup, improving your coffee’s taste and machine performance. Choose the method that fits your needs and follow safety tips carefully.
Using Vinegar Safely
White vinegar is a popular natural choice for descaling Keurig machines. It dissolves mineral deposits and kills bacteria. Use equal parts white vinegar and water for the cleaning solution. Avoid using undiluted vinegar as it can harm the machine.
Before starting, empty the water reservoir and remove any K-cup. Fill the reservoir with the vinegar solution. Run several brew cycles without inserting a coffee pod. Discard the liquid after each cycle.
After descaling, run 4-5 cycles with fresh water only. This step removes the vinegar taste and smell. Never use colored or flavored vinegar to avoid damage or residue. Clean the reservoir and other removable parts with warm, soapy water after descaling.
Commercial Descaling Solutions
Commercial descaling products are specially formulated to remove limescale efficiently. They are safe for Keurig machines and usually come with clear instructions. These solutions work faster and may leave no odor behind.
To use, empty the water reservoir and add the descaling solution mixed with water as directed. Run brew cycles, discarding the liquid each time. The machine’s descale mode can help guide the process if available.
After completing the descaling cycles, flush the machine by running multiple cycles with clean water. This ensures no solution remains inside. Store commercial descalers in a cool, dry place and keep them out of reach of children.
Credit: www.picknsave.com
Frequently Asked Questions
How Do I Get My Keurig To Descale?
Turn off your Keurig and activate descale mode. Run brew cycles with descaling solution until “Add Water” lights up. Refill with fresh water and run water-only cycles until the descale light turns off. Clean the reservoir and parts before use.
How Do I Descale A Keurig With Vinegar?
Empty the water reservoir and remove any K-cup. Fill it halfway with white vinegar and water. Run brew cycles without a pod until the reservoir empties. Refill with fresh water and run several water-only cycles. Wipe the machine and resume normal use.
How Do I Reset The Descale Light On My Keurig?
Turn off your Keurig. Press and hold the brew button until the descale light blinks. Run descaling cycles with solution, then rinse with fresh water until the light turns off.
Which Two Buttons To Push To Descale Keurig?
To descale a Keurig, press and hold the “Power” and “Brew” buttons simultaneously until the descale light flashes.
Conclusion
Descaling your Keurig keeps it working well and tasting great. Regular cleaning removes mineral build-up that blocks water flow. Use the right solution and follow each step carefully. Rinse thoroughly to avoid any leftover taste. A clean machine makes better coffee every time.
Keep your Keurig fresh by descaling every few months. Simple care extends its life and improves your coffee experience. Don’t skip this easy process—it really helps. Your daily cup will thank you!