Have you ever picked up a tape measure and felt lost trying to understand what all those lines and numbers mean? You’re not alone.
Whether you’re fixing something around the house or working on a DIY project, knowing how to read a tape measure is an essential skill that can save you time, money, and frustration. Imagine being able to measure accurately with confidence every time—no more guesswork, no more mistakes.
In this guide, you’ll learn simple, clear steps to read a tape measure like a pro. By the end, you’ll see how easy it is to decode those inches and fractions, so you can tackle any project with precision. Ready to take control of your measurements? Let’s get started!

Credit: www.youtube.com
Tape Measure Basics
Learning the basics of a tape measure is key to measuring accurately. A tape measure shows both inches and metric units. It has different lines and numbers that tell you the length. Understanding these markings helps you read measurements quickly and correctly. This guide breaks down the tape measure into simple parts.
Inch And Metric Scales
Tape measures often have two scales: inches and metric. The inch scale is marked on one side. It shows feet and inches, divided into smaller fractions. The metric scale uses centimeters and millimeters. These units are easier for some tasks and more precise for others. Knowing which scale to use depends on your project.
Line Lengths And Their Values
Lines on the tape measure show different values. Long lines mark full inches or centimeters. Medium lines divide inches into halves or centimeters into millimeters. Short lines show smaller fractions like quarters, eighths, or sixteenths of an inch. The longer the line, the bigger the measurement it represents. This helps you quickly spot the size.
Reading Bold Numbers
Bold numbers on the tape measure mark whole units. On the inch side, bold numbers show each inch and foot. On the metric side, bold numbers indicate full centimeters. These numbers are easy to see and help you read measurements fast. Focus on these numbers first, then check the smaller lines for exact lengths.
Fractional Measurements
Fractional measurements on a tape measure break down inches into smaller parts. These parts help you measure with more detail and accuracy. Understanding these fractions makes reading a tape measure easier. It also helps in many tasks like woodworking or sewing. Let’s explore how to identify and use these fractions.
Identifying Halves And Quarters
On a tape measure, the longest lines show full inches. The next longest lines mark halves. A half is 1/2 of an inch. It is the line right in the middle between two whole inches. The lines shorter than halves show quarters. Quarters split an inch into four parts. Each quarter is 1/4 of an inch. These lines are placed between the half-inch and full-inch marks.
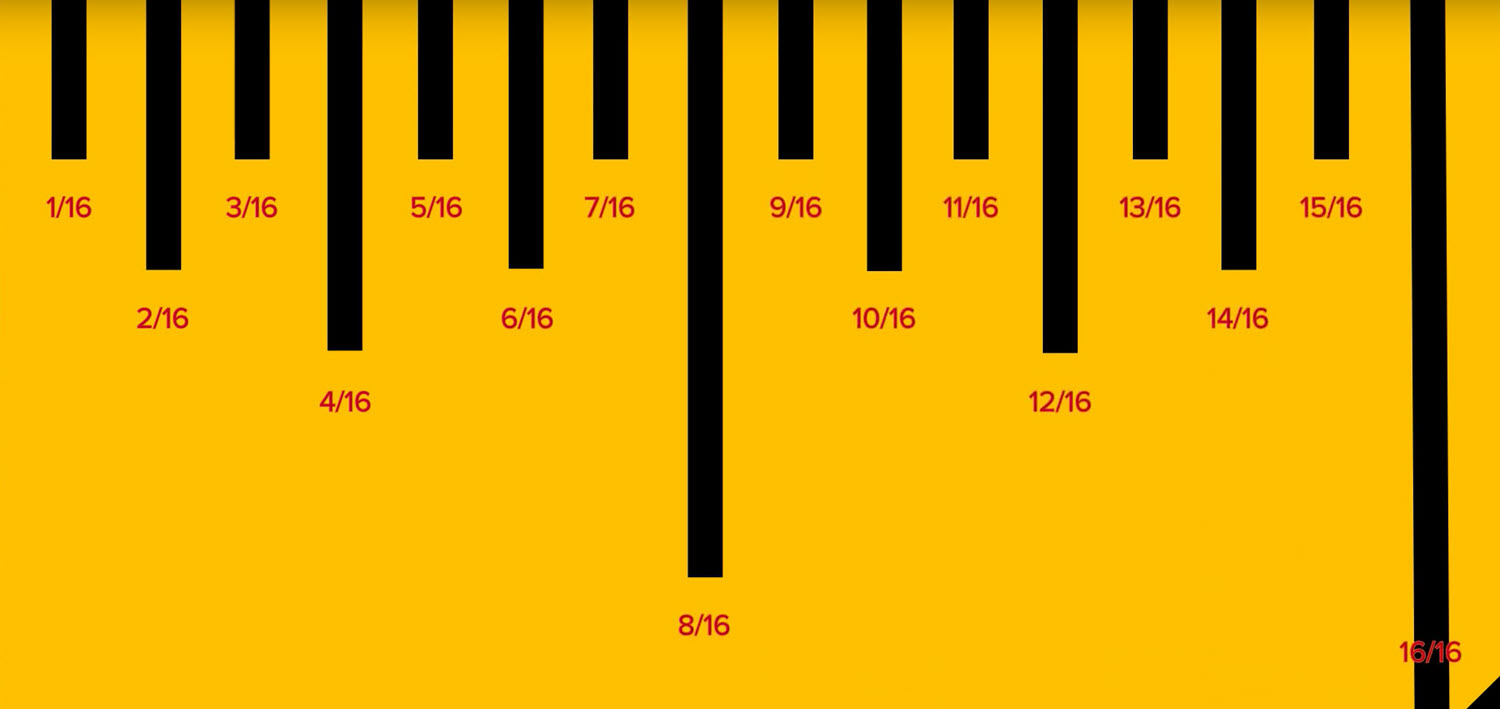
Understanding Eighths And Sixteenths
Smaller lines on the tape measure show eighths and sixteenths of an inch. Eighths divide each quarter into two parts. Sixteenths divide each eighth into two parts again. These lines are shorter than quarters and halves. Counting these small lines helps you measure very small distances. Sixteenths are the smallest common fractions on most tape measures.
Converting Fractions To Decimals
Sometimes decimals are easier to use than fractions. To convert fractions, divide the top number by the bottom number. For example, 1/2 equals 0.5 because 1 divided by 2 is 0.5. One quarter, or 1/4, equals 0.25. This simple math helps you read measurements faster. It also helps when using digital tools that need decimals.
Using The Floating Hook
The floating hook is a small metal tab at the tape measure’s end. It moves slightly back and forth. This movement helps get accurate measurements. Understanding how to use the floating hook makes measuring easier and more precise.
Purpose Of The Floating Hook
The floating hook adjusts for its own thickness. It moves to compensate when measuring inside or outside edges. This ensures the measurement starts exactly at zero. Without it, measurements could be off by the hook’s thickness.
Measuring Inside Dimensions
To measure inside dimensions, push the floating hook against the inside edge. For example, measure a window frame’s inner width. The hook presses firmly to the edge and stays flush. This captures the true distance between two inside points.
Measuring Outside Dimensions
To measure outside dimensions, hook the floating hook over the object’s outer edge. The hook catches the edge securely. Pull the tape straight and read the number at the other end. This method works for objects like boards or pipes.

Credit: www.thehandymansdaughter.com
Taking Accurate Measurements
Taking accurate measurements with a tape measure is key to successful projects. It ensures parts fit well and materials are cut correctly. Careful technique helps avoid errors that waste time and resources. Follow simple steps to get precise numbers every time.
Starting At Zero
Begin by placing the tape measure’s metal hook at the exact start point. The hook should align with the edge or mark you want to measure from. Check that the zero mark on the tape is flush with this point. This ensures the measurement starts correctly and avoids small errors.
Extending The Tape Properly
Pull the tape out straight and tight across the object. Avoid letting it sag or bend. A loose tape can give a longer, false reading. Keep the tape flat against the surface. Hold it steady to prevent it from moving while you note the number.
Avoiding Common Mistakes
Do not measure from the hook’s tip only. The hook moves slightly to adjust for its thickness. Use the hook’s edge for outside measurements and push the hook inside for internal ones. Watch out for worn or damaged tape marks. They can cause wrong readings. Always double-check your measurement for accuracy.
Quick Tips For Beginners
Starting to read a tape measure can feel tricky. The key is to keep things simple. These quick tips help beginners build confidence fast. Focus on clear steps. Practice often. Keep your tape measure ready. Small habits make a big difference.
Practicing With Simple Objects
Choose everyday items like a book or a phone. Measure their length using the tape. Look closely at the numbers and lines. Notice how the tape shows inches and fractions. Repeat this with different objects. This builds a strong understanding of the markings.
Reading Measurements Fast
Learn to spot the bold numbers first. They show full inches. Then check the smaller lines between numbers. These lines represent fractions like halves, quarters, or eighths. Practice reading these quickly. Try saying the measurement aloud. This helps improve speed and accuracy.
Maintaining Your Tape Measure
Keep the tape clean and dry. Wipe off dirt and dust regularly. Avoid letting the tape snap back hard. This can damage the markings and the case. Store it in a safe place after use. A well-kept tape measure lasts longer and works better.
Credit: learn.reeb.com
Frequently Asked Questions
How Do You Read A Tape Measure For Beginners?
Start at zero by placing the metal hook on the object’s edge. Read the bold numbers for inches. Use the smaller lines between numbers for fractions, like halves or quarters. Pull the tape straight and note the longest lines for larger fractions.
Practice to improve accuracy.
What Is Each Line On A Tape Measure?
Each line on a tape measure represents a fraction of an inch or a centimeter. Longer lines mark whole numbers. Medium lines indicate halves, quarters, eighths, or sixteenths. Shorter lines show smaller fractions. This helps measure precise lengths quickly and accurately.
What Is The Age Trick With A Tape Measure?
The age trick with a tape measure estimates age by measuring arm span in inches. Each inch equals one year.
How To Read 9 16?
Read 9 16 as “nine sixteenths. ” It represents nine parts out of sixteen equal divisions of an inch.
Conclusion
Reading a tape measure is simple with practice. Focus on the numbers first. Then, notice the small lines for fractions. Always start measuring from zero. Pull the tape straight and keep it tight. Use the hook to help with inside or outside edges.
With these steps, measuring feels easy and quick. Keep trying, and your confidence will grow. Soon, reading a tape measure will become a natural skill.